 Honda Accord: Lift and Support Points
NOTE: If you are going to remove heavy components such as suspension or the fuel tank from the rear of the vehicle, first support the front of the vehicle with tall safety stands. When substantial weight is removed from the rear of the vehicle, the center of gravity can change, causing the vehicle to tip forward on the lift.
Vehicle Lift
1. Position the lift blocks (A) under the vehicle's front support points (B) and rear support points (C).
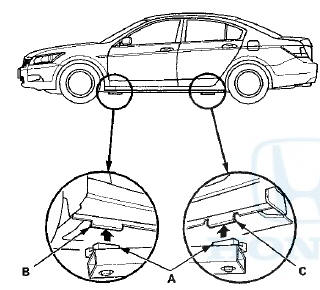
2. Raise the lift a few inches, and rock the vehicle gently to be sure it is firmly supported.
3. Raise the lift to its full height, and inspect the vehicle support points for solid contact with the lift blocks.
Safety Stands
To support the vehicle on safety stands, use the same support points as for a vehicle lift. Always use safety stands when working on or under any vehicle that is only supported by a jack.
Floor Jack
1. When lifting the front of the vehicle, set the parking brake. When lifting the rear of the vehicle, put the shift lever in reverse for manual transmission, or in the P position for automatic transmission.
2. Block the wheels that are not being lifted.
3. Position the floor jack under the front jacking bracket (A) or the rear jacking bracket (B). Center the jacking bracket on the jack lift platform (C), and jack up the vehicle high enough to fit the safety stands under it.
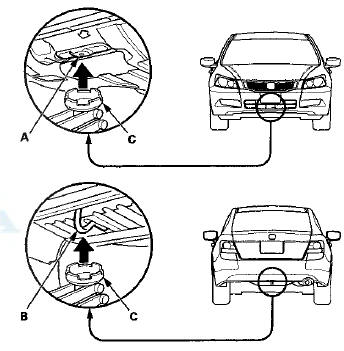
4. Position the safety stands under the support points, and adjust them so the vehicle is level.
5. Lower the vehicle onto the stands.
 Under-hood Emission Control Label
Emission Group Identification
Example:
08 Model
COMFORMS TO REGULATIONS: 2008 MY
Test Group and Evaporative Family
Test Group:
Model Year
8: '08
9: '09
A: "10
Manufacturer Subcode ...
 Towing
If the vehicle needs to be towed, call a professional
towing service. Never tow the vehicle behind another
vehicle with just a rope or chain It is very dangerous.
Emergency Towing
There are three ...
See also:
Rear Door Sash Inner Trim
Replacement
4-door
NOTE: Take care not to scratch the door.
1. Remove the door panel (see page 20-38).
2. Lower the glass fully.
3. Remove the door sash inner trim (A).
-1. Pull back the outside edge ...
Countershaft Disassembly, Inspection,
and Reassembly
1. Inspect the needle bearings for galling and rough movement.
2. Inspect the splines for excessive wear and damage.
3. Check the shaft bearing surface for scoring and excessive wear.
4. Lubr ...
Introduction
The following pages provide
instructions on how to properly
protect the driver, adult passengers,
and teenage children who are large
enough and mature enough to drive
or ride in the front.
...