 Honda Accord: Instrument Visor Removal/Installation
Special Tools Required
KTC Trim Too! Set SOJATP2014*
*Available through the Honda Tool a n d Equipment Program; call 888-424-6857
NOTE: - Take care not to scratch the dashboard or the related parts.
- Use the appropriate tool from the KTC trim tool set to avoid damage when removing components.
1. Adjust the steering column to the full tilt down position.
2. Detach the clips fastening the column blind cover (A) from the upper column cover (B) by hand.
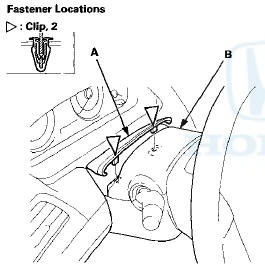
3. If necessary, release the hooks (A), then remove the column blind cover (B) from the instrument visor (C).

4. Gently pull out along the edge of the instrument visor (A) to detach the clips (B, C) and release the hooks (D, E), and release the hooks (E) by pulling out the visor, then remove the visor.
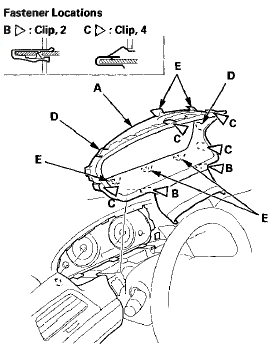
5. Install the visor in the reverse order of removal, and note these items: - If the clips are damaged or stress-whitened, replace them with new ones.
- Push the clips and the hooks into place securely
 Dashboard
...
 Driver's Dashboard Lower Cover
Removal/Installation
Driver's Dashboard Lower Cover
Removal/Installation
Special Tools Required
KTC Trim Tool Set SOJATP2014*
* Available through the Honda Tool and
Equipment
Program; call 888-424-6857
NOTE;
- Take care not to scratch the dashboard or the related
p ...
See also:
Engine Number
a. Engine Type
K24Z2: 2.4 L DOHC i-VTEC Sequential Multiport
Fuel-injected, 177HP engine
K24Z3: 2.4 L DOHC i-VTEC Sequential Multiport
Fuel-injected, 190HP engine
b. Serial Number
1000001 -вР...
Changing the Wiper Blade Rubber
1. Lift the driver side wiper arm first, then the
passenger side.
2. Press and hold the tab, then slide the blade
from the wiper arm.
NOTICE
Avoid dropping the wiper arm; it may damage the ...
Rear Seats
• Folding Down the Rear Seat
1. Remove the center shoulder belt from the
guide.
2. Pull the release lever in the trunk to release
the lock.
3. Fold the seat-back down.
If the rear head ...