 Honda Accord: Immobilizer-Keyless Control Unit Input
Test
Honda Accord: Immobilizer-Keyless Control Unit Input
Test
NOTE: Before testing, troubleshoot the multiplex integrated control unit first, using B-CAN System Diagnosis Test Mode A (see page 22-134).
1. Remove the driver's dashboard lower cover (see page 20-166).
2. Remove the steering column covers (see page 20-181).
3. Disconnect the 7P connector (A) from the immobilizer-keyless control unit (B).
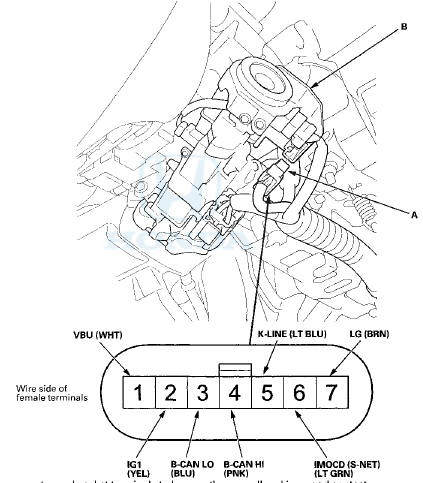
4. Inspect the connector and socket terminals to be sure they are all making good contact.
• If the terminals are bent, loose or corroded, repair them as necessary, and recheck the system.
• If the terminals look OK, go to step 5.
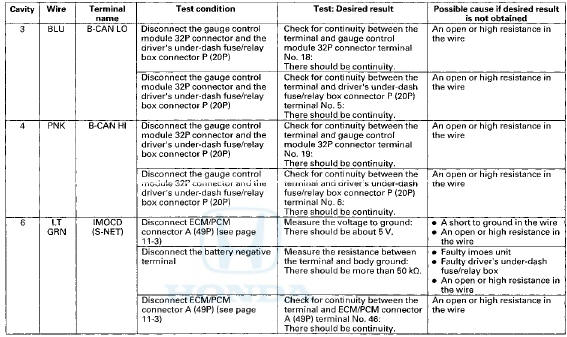
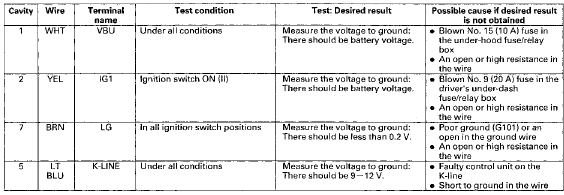
5. With the connector still disconnected, do these Input tests at the following connector.
• If any test indicates a problem, find and correct the cause, then recheck the system.
• If all the input tests prove OK, go to step 6.
6. Reconnect the connector to the immobilizer-keyless control unit, and do these input tests at the following connector.
• If any test indicates a problem, find and correct the cause, then recheck the system.
• If all the input tests prove OK, replace the immobilizer-keyless control unit (see page 22-440).
NOTE: If you replace the immobilizer-keyless control unit, do the immobilizer registration (see page 22-439).
 Status Log
If you suspect there is a immobilizer system problem, check the status log.
1. Connect the HDS to the data link connector.
2. Turn the ignition switch to ON (II).
3. On the HDS screen, at MAI ...
 Immobilizer Key Registration
NOTE:
• The HDS is required for registration of the immobilizer
keys.
• Programming the immobilizer also programs the
keyless transmitter.
• Check for aftermarket electrical eq ...
See also:
Clutch Wave-plate Phase Difference
Inspection
1. Place the clutch wave-plate (A) on a surface plate, and
set a dial indicator (B) on the wave-plate.
2. Find the bottom (C) of a phase difference of the
wave-plate, zero the dial indicator an ...
Brake Assist System
• Brake Assist System
Designed to assist the driver by generating greater braking force when you
depress
the brake pedal hard during emergency braking.
• Brake assist system operation
Press ...
If YouMust Drive with Several Children
Your vehicle has a back seat where
children can be properly restrained.
If you ever have to carry a group of
children, and a child must ride in
front:
Place the largest child in the front
se ...