 Honda Accord: Ignition Timing Inspection
1. Connect the Honda Diagnostic System (HDS) to the data link connector (DLC) (see step 2 on page 11-3).
2. Turn the ignition switch to ON (II).
3. Make sure the HDS communicates with the vehicle and the engine control module (ECM)/powertrain control module (PCM). If it does not communicate, troubleshoot the DLC circuit (see page 11-181).
4. Check for DTCs (see page 11-3). If a DTC is present, diagnose and repair the cause before continuing with this test.
5. Start the engine. Hold the engine speed at 3,000 rpm with no load (in N or P (A/T model) or neutral (M/T model)) until the radiator fan comes on, then let it idle.
6. Check the idle speed (see page 11-292).
7. Jump the SCS line with the HDS.
NOTE: This step must be done to protect the ECM/PCM from damage.
8. Connect the timing light to the service loop (white tape).
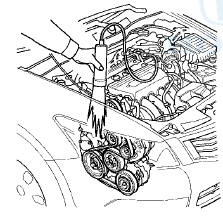
9. Aim the light toward the pointer (A) on the cam chain case. Check the ignition timing under a no load condition (headlights, blower fan, rear window defogger, and air conditioner are turned off).
NOTE: The other pointer (C) is not used.
Ignition Timing:
M/T model: 8 Р’В± 2 Р’В°BTDC (RED mark (B)) at idle in neutral
A/T model: 8 Р’В± 2 Р’В°BTDC (RED mark (BР’В» at idle in NorP
10. If the ignition timing differs from the specification, check the cam timing. If the cam timing is OK, update the ECM/PCM if it does not have the latest software (see page 11-203), or substitute a known-good ECM/PCM (see page 11-7), then recheck. If the system works properly, and the ECM/PCM was substituted, replace the original ECM/PCM (see page 11-204).
11. Disconnect the HDS and the timing light.

 Ignition Coil and Spark Plug
Removal/Installation
Ignition Coil and Spark Plug
Removal/Installation
1. Remove the ignition coil cover (A).
2. Disconnect the ignition coil connectors (B), then
remove the ignition coils (C).
3. Remove the spark plug and inspect them (see page
4-20).
4. Appl ...
See also:
Passenger's Middle Pad
Removal/Installation
Special Tools Required
KTC Trim Tool Set SOJATP2014*
*Available through the Honda Tool and
Equipment
Program; call 888-424-6857
SRS components are located in this area. Review the
SRS component ...
Front Passenger's Power Window
Switch Input Test
1. Turn the ignition switch to LOCK (0), open and close the driver's door,
then remove the front passenger's power
window switch.
• 4-door (see page 22-306)
• 2-door (see page 22-307)
...