 Honda Accord: Idler Gear Shaft Removal and
Installation
Honda Accord: Idler Gear Shaft Removal and
Installation
1. Remove the snap ring (A), the cotter retainer (B), and the 17 mm cotters (C). Do not distort the snap ring.
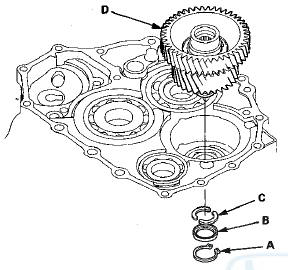
2. Remove the idler gear shaft/idler gear assembly (D) from the transmission housing.
3. Check the snap ring and the cotter retainer for wear and damage. Replace them if they are worn, distorted, or damaged.
4. Install the idler gear shaft/idler gear assembly in the reverse order of removal.
 Secondary Shaft 1 st Gear Axial
Clearance Inspection
Secondary Shaft 1 st Gear Axial
Clearance Inspection
Special Tools Required
Attachment, 42 mm I.D. 07QAD-P0A0100
1. Remove the secondary shaft transmission housing
bearing (see page 14-270).
2. Install the thrust needle b e a r i n g (A), the need ...
 Idler Gear/Idler Gear Shaft
Replacement
Idler Gear/Idler Gear Shaft
Replacement
Special Tools Required
-Driver Handle, 15 x 135L 07749-0010000
-Attachment, 32 x 35 mm 07746-0010100
1. Remove the snap ring from the idler gear/idler shaft
assembly. Do not distort the snap ring. ...
See also:
Precautions and Procedures
General Precautions
NOTE: Some systems store data in memory that is lost
when the battery is disconnected. Before disconnecting
the battery, refer to Battery Terminal Disconnection and
Reconnectio ...
Frame Repair Chart
Top View
g2 Front floor locating hole 025 (0.98) rear
h2 Front floor tunnel frame locating hole 013 (0.51) rear
i Rear frame A locating hole 025 (0.98)
j Rear floor locating hole 025 (0.98)
k1 ...