 Honda Accord: How to Refuel
1. Stop your vehicle with the service station
pump on the left side of the vehicle in the
rear.
2. Turn off the engine.
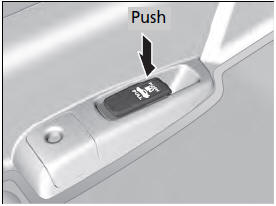
3. Push on the fuel fill door release handle at
the foot of the driver’s seat.
- The fuel fill door opens.
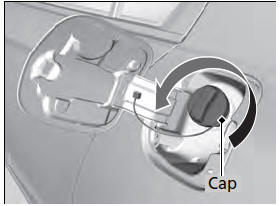
4. Remove the fuel fill cap slowly. If you hear a release of air, wait until this stops, then turn the knob slowly to open the fuel fill cap.
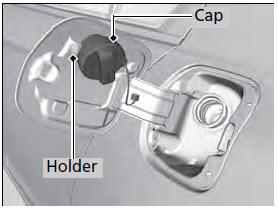
5. Place the fuel fill cap in the holder.
6. Insert the filler nozzle fully.
- When the tank is full, the fuel nozzle will
click off automatically. This leaves space
in the fuel tank in case the fuel expands
with a change in the temperature.
7. After filling, replace the fuel fill cap, tightening
it until you hear it click at least once.
- Shut the fuel fill door by hand.
WARNING
Gasoline is highly flammable and explosive.
You can be burned or seriously injured when handling fuel.
• Stop the engine, and keep heat, sparks,
and flame away.
• Handle fuel only outdoors.
• Wipe up spills immediately.
The filler nozzle automatically stops to leave space in the fuel tank so that fuel does not overflow as a result of changes in air temperature.
If the fuel nozzle keeps turning off when the tank is not full, there may be a problem with the pump's fuel vapor recovery system. Try filling at another pump. If this does not fix the problem, consult a dealer.
Do not continue to add fuel after the nozzle has automatically stopped. Additional fuel can exceed the full tank capacity.
 Fuel Information
• Fuel recommendation
Use of a lower octane gasoline can cause a persistent, heavy metallic
knocking noise
that can lead to engine damage.
• Top tier detergent gasoline
Because the level ...
 Fuel Economy
Improving Fuel Economy
Fuel economy depends on several conditions, including driving conditions,
your
driving habits, the condition of your vehicle, and loading. Depending on these
and
other ...
See also:
Symptom Troubleshooting Index
...
System Description
The air conditioning (A/C) system removes heat from the passenger compartment
by transferring heat from the ambient
air to the evaporator. The A/C system refrigerant expands in the evaporator, and ...
Driver's Inner Middle Pad
Removal/Installation
Special Tools Required
KTC Trim Tool Set SOJATP2014*
* Available through the Honda Tool and Equipment
Program; call 888-424-6857
NOTE:
-Take care not to scratch the dashboard or
the related
pa ...