 Honda Accord: Horn Switch Test
NOTE: Check for a blown No. 10 (20 A) fuse in the under-hood fuse/relay box. If it is blown, check for a faulty horn relay.
1. Turn the steering wheel 180 degrees from the center position and remove the cover (A).
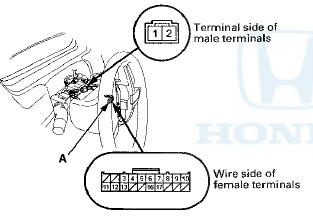
Wire side of female terminals
2. Disconnect the horn switch 2P connector (B).
3. Connect horn switch 2P connector terminals No. 1 and No. 2 with a jumper wire. The horns should sound.
• If the horns sound, check or adjust the installation of the driver's airbag assembly and the horn switch plate.
• If the horns don't sound, go to step 4.
4. Remove the jumper wire from the horn switch 2P connector.
5. Remove the steering column covers (see page 20-181).
6. Remove the driver's airbag assembly (see page 24-211).
7. Disconnect cable reel subharness 2 0 P connector (A).
8. Connect cable reel subharness 20P connector (A) terminals No. 11 and No. 12 with a jumper wire. The horns should sound.
• If the horns sound, replace the cable reel subharness.
• If the horns don't sound, go to step 9.
9. Disconnect the dashboard wire harness 20P connector (A).
10. Connect dashboard wire harness 20P connector terminals No. 1 and No. 2 with a jumper wire. The horns should sound.
• If the horns sound, replace the cable reel.
• If the horns don't sound, repair an open in terminal No. 2 or No. 1 wire, or a faulty driver's MICU.
 Horn Test/Replacement
1. Remove the grille cover;
•2-door (see page 20-274)
• 4-door (see page 20-274)
2. Disconnect the 1P connector (A) from each horn (B).
3. Test the horn by momentarily connecting L _.t ...
 Exterior Lights
...
See also:
To Play the Radio
The band and frequency that the
radio was last tuned to are displayed.
To change bands, press the AM or
FM button. On the FM band, ST will
be displayed if the station is
broadcasting in stere ...
Passenger's Under-dash Fuse/Relay
Box (MICU) Removal and
Installation
NOTE: SRS components are located in this area. Review
the SRS component locations 4-door (see page 24-21),
2-door (see page 24-23), and precautions, and
procedures (see page 24-25) before doing rep ...
Dual Temperature Control
Your vehicle has two temperature
control switches, one for the driver,
and one for the front passenger.
The temperatures of the driver’s side
and the front passenger’s side are
controlled ...