 Honda Accord: Hood Adjustment
1. Remove these Items: - Front grille cover: - 2-door (see page 20-274) - 4-door (see page 20-274) - Cowl covers (see page 20-278) - Hood latch cover, 4-door (see step 2 on page 20-302) 2. Slightly loosen the hood hinge mounting bolts (A) and the hood latch mounting bolts (B).
6x 1.0
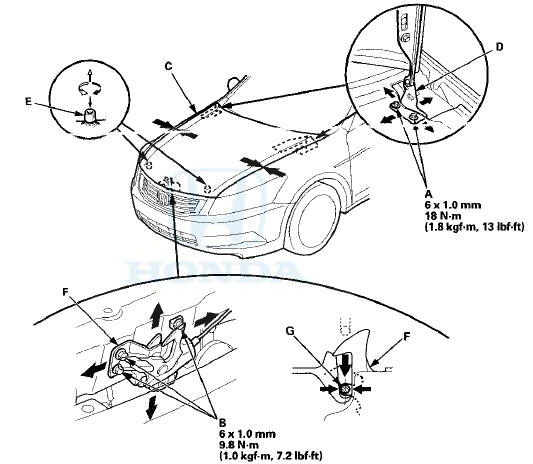
3. Adjust the hood (C) alignment in the following sequence: - Adjust the hood right and left, as well as forward and rearward, by using the elongated holes in the hood hinges (D).
- Turn the hood edge cushions (E), in or out as necessary, to make the hood fit flush with the body at the front and side edges.
4. Adjust the hood latch (F) to obtain the proper height at the forward edge, and move the latch right or left until the striker (G) is centered in the latch.
5. Tighten each bolt to the specified torque.
6. Check that the hood opens properly and closes securely.
7. Apply touch-up paint to the hinge mounting bolts and around the hinges, and let the paint dry.
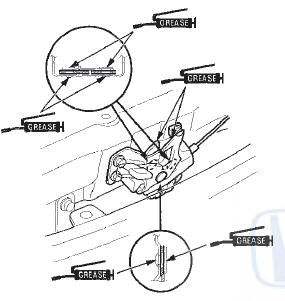
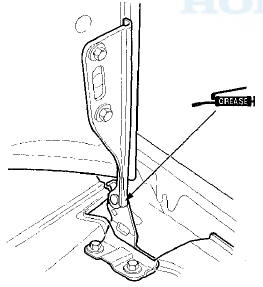
8. Apply multipurpose grease to the hood latch and the hood hinges as indicated by the arrows.
9. Reinstall all of the removed parts.
 Hood
Hood
...
 Hood Seal and Hood Molding
Replacement
Hood Seal and Hood Molding
Replacement
NOTE: Take care not to scratch the hood.
1. Detach the clips (A) with a clip remover, then remove
the hood seal (B). On Canada models: Detach the clips
(C), then remove the hood molding (D).
2-d ...
See also:
Mainshaft 5th Gear Axial Clearance
Inspection
1. Remove the mainshaft transmission housing bearing
(seepage 14-270).
2. Install the thrust needle bearing ( A ) , 5th gear ( B ) , the
needle bearing (C), the thrust needle bearing (D), the
41 ...
When Driving
...
Outboard Joint Side
1. Wrap the splines on the driveshaft with vinyl tape (A)
to prevent damaging the outboard boot.
2. Install new ear clamp bands (B) and the outboard boot
onto the driveshaft, then remove the viny ...