 Honda Accord: Headlight Bulbs
When replacing, use the following bulbs.

• High Beam Headlight
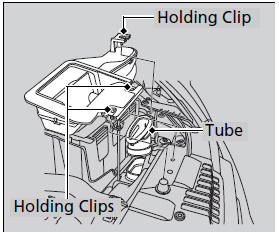

1. Unlock the holding clips, then remove the upper part of the air intake duct and the air intake tube.
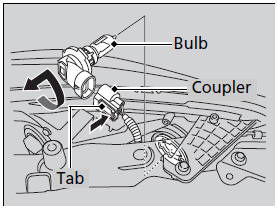
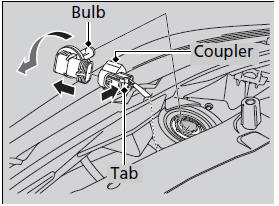
2. Push the tab to remove the coupler.
3. Rotate the old bulb to the left to remove.
4. Insert a new bulb into the headlight
assembly and turn it to the right.
5. Insert the coupler into the connector of the
bulb.

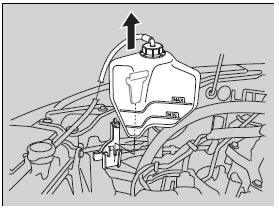
1. Remove the engine coolant reservoir.
NOTICE
Halogen bulbs get very hot when lit.
Oil, perspiration, or a scratch on the glass can cause the bulb to overheat and shatter.
The headlight aim is set by the factory, and does not need to be adjusted. However, if you regularly carry heavy items in the trunk or tow a trailer, have the aiming readjusted at a dealer or by a qualified technician.
When replacing a halogen bulb, handle it by its base, and protect the glass from contact with your skin or hard objects. If you touch the glass, clean it with denatured alcohol and a clean cloth.
The exterior lights' inside lenses (headlights, brake lamps, etc.) may fog temporarily after a car wash or while driving in the rain. This does not impact the exterior light function.
However, if you see a large amount of water or ice accumulated inside the lenses, have your vehicle inspected by a dealer.
Holding clip
Press down the central pin until it clicks to unlock it.
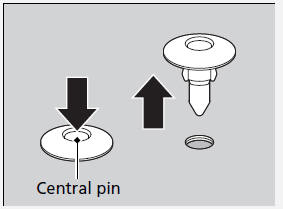
Push the central pin back to lock the clip. Then, insert the clip into the hole and press on the central pin until it is flat.

• Low Beam Headlights

1. Push the tab to remove the coupler.
2. Rotate the old bulb to the left to remove.
3. Insert a new bulb into the headlight
assembly and turn it to the right.
4. Insert the coupler into the connector of the
bulb.

Low beam headlight bulbs are LED type. Have an authorized Honda dealer inspect and replace the light bulbs.

 Fog Light Bulbs*
When replacing, use the following bulbs.
1. Loosen the screw using a Phillips-head
screwdriver.
- Be careful not to rotate the screwdriver
more than one or two times to the left.
...
See also:
Rear Brake Pad Inspection and Replacement
CAUTION
Frequent inhalation of brake pad dust, regardless of
material composition, could be hazardous to your
health.
- Avoid breathing dust particles.
-Never use an air hose or brush to clea ...
Damper/Spring Removal and Installation
Removal
1. Raise and support the vehicle (see page 1-13).
2. Remove the rear wheel.
3. Fold down the rear seat-back, then remove the lid (A).
NOTE: For 4-door, lift up the tab (B) inside und ...
Driving Position Memory System*
You can store two driver’s seat positions with the driving position memory
system.
When you unlock and open the driver’s door with a remote, the seat adjusts
automatically to one of the two ...