 Honda Accord: Head Restraints
Your vehicle is equipped with head restraints in all seating positions to help protect you and your passengers from the likelihood of whiplash and other injuries.
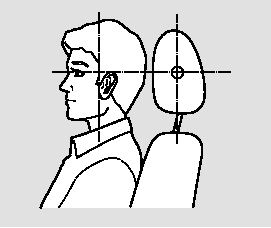
They are most effective when you adjust them so the center of the back of the occupant’s head rests against the center of the restraint.
Adjusting the Head Restraint
The head restraints adjust for height.
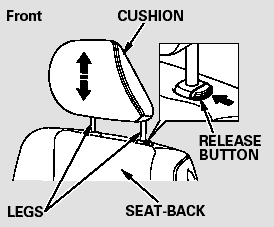
You need both hands to adjust a restraint.Do not attempt to adjust it while driving. To raise it, pull upward.
To lower the restraint, push the release button sideways, and push the restraint down.

Removing the Head Restraint
To remove a head restraint for cleaning or repair, pull it up as far as it will go. Push the release button, then pull the restraint out of the seatback.

Failure to reinstall the head restraints can result in severe injury during a crash.
Always replace the head restraints before driving.
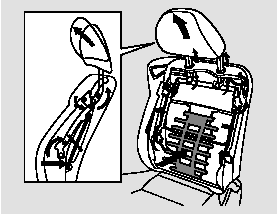
When reinstalling a head restraint, put the legs back in place. Then adjust it to the appropriate height while pressing the release button.
Make sure the head restraint locks in position when you reinstall it.
Active Head Restraints
The driver’s and front passenger’s seats have active head restraints. If the vehicle is struck severely from the rear, the occupant properly secured with the seat belt will be pushed against the seat-back and the head restraint will automatically move forward.
This reduces the distance between the restraint and the occupant’s head.
It also helps protect the occupants against the likelihood of whiplash and injuries to the neck and upper spine.
After a collision, the activated restraint should return to its normal position.
If the restraints do not return to their normal position, or in the event of a severe collision, have the vehicle inspected by a Honda dealer.
For a head restraint system to work properly:
Do not hang any items on the head restraints, or from the restraint legs.
Do not place any object between an occupant and the seat-back.
Install each restraint in its proper location.
Only use genuine Honda replacement head restraints.
 Rear Seat Access
Driver’s Side
On all V6 models and 4-cylinder EX-L
model
To get into the rear seat on the
driver’s side, open the door and pull
the release lever up on the side of
the seat-back. The s ...
 Folding Rear Seat
The back of the rear seat folds down,
giving you direct access to the trunk.
The seat-back is released from inside
the trunk.
When storing cargo, you can move
the rear center shoulder belt o ...
See also:
Symptom Troubleshooting Index
When the vehicle has one of these symptoms, check for VSA diagnostic trouble
codes (DTCs) with the HDS. If there are
no DTCs, do the diagnostic procedure for the symptom, in the sequence listed,
...
If the Brake System Indicator (Red)Comes On
• Reasons for the indicator to come on
• The brake fluid is low.
• There is a malfunction in the brake system.
• What to do when the indicator comes on while driving
Press the brake ped ...
Alternator Control Circuit
Troubleshooting
NOTE: Do this troubleshooting if, in step 5 of the
alternator and regulator circuit troubleshooting (see
page 4-27), the battery voltage is less than 13.5 V.
* 1. Connect the Honda Diagnostic Sys ...