
 Honda Accord: Glass Replacement
1. Close the glass fully.
2. Slide the sunshade all the way back.
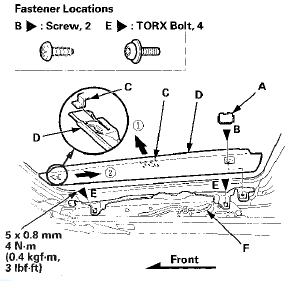
3. Pry out the lid (A), remove the screw (B), and release the hooks (C), then remove the bracket cover (D).
Repeat on the opposite side. Remove the TORX bolts (E) with a TORX T25 bit from the glass brackets (F) on both sides.
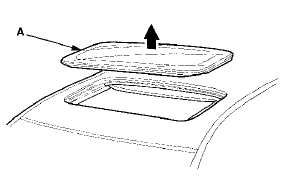
4. Remove the glass (A) by lifting it up. Do not damage the roof panel.
5. Install the glass in the reverse order of removal, and check the glass position alignment procedure (see page 20-91).
6. Check for water leaks (see step 9 on page 20-57). Let the water run freely from a hose without a nozzle. Do not use high-pressure water.
NOTE: It is normal for some water to seep past the moonroof into the moonroof frame, and exit through the drains.
 Glass Position Adjustment
The roof panel (A) should be even with the glass
weatherstrip (B), to within 0+1/— 1 mm
(0+0.04/—0.04 in) all the way around. If not make the
following adjustment:
1. Remove the brac ...
 Glass Weatherstrip Replacement
1 . Remove the moonroof glass (see page 20-91).
2. Place a piece of masking tape (A) on the middle of the
front edge of the moonroof glass (B). Make sure that
the tape is on the glass only, and i ...
See also:
Driving
This chapter discusses driving, refueling, and
information on items such as accessories. ...
TripMeter
The trip meter shows the number of
miles (U.S.) or kilometers (Canada)
driven since you last reset it.
There are two trip meters: Trip A
and Trip B. Switch between these
displays by pressing ...
Engine Number
Engine Type
K24Z2: 2.4 L DOHC i-VTEC Sequential Multiport
Fuel-injected, 177HP engine
K24Z3: 2.4 L DOHC i-VTEC Sequential Multiport
Fuel-injected, 190HP engine
Serial Number
2000001 - K24Z2 prod ...