 Honda Accord: Gearbox Mount Cushion Replacement
1. Remove the steering gearbox (see page 17-37).
2. Position a 40 mm socket (A) on the flange part of the gearbox housing with a washer (B), a 10 x 150 mm flange bolt (C), and a 10 mm nut (D) as shown.

3. Hold the flange bolt with a wrench, and tighten the nut with a wrench. Remove the gearbox mount cushion ( E ) .
4. Apply a mild soap and water solution to the new gearbox mount cushion surface (A), then place the mount cushon on the gearbox mounting cushion hole.

5. Position a 40 mm socket on the flange part of the gearbox housing with a washer, a flange bolt, and a nut as shown.
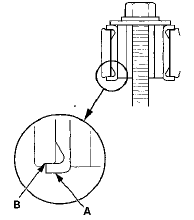
6. Install the gearbox mount cushion by tightening the nut until the mount cushion edge (A) properly fits on the gearbox flange surface (B).
7. Install the steering gearbox (see page 17-60).
 Tie-rod End Ball Joint Boot Replacement
Special Tools Required
Bearing Driver Attachment, 36 07965-SA50500
1 Disconnect the tie-rod end ball joint from the knuckle
(see step 26 on page 17-41).
2. Remove the tie-rod end from the rack e ...

See also:
Engine Installation
Special Tools Required
- Universal Lifting Eyelet 07AAK-SNAA120
Engine Hanger Adapter VSB02C000015
Engine Support Hanger, A and Reds AAR-T-1256*
Subframe Adapter VSB02C000016
Subframe Alignment P ...
Accessory Power Socket Trim
Removal/Installation
Special Tools Required
KTC Trim Tool Set SOJATP2014*
*Available through the Honda Tool and
Equipment
Program; call 888-424-6857
NOTE:
- Take care not to scratch the console.
- Use the approp ...
Fuel Tank Replacement
1. Drain the fuel tank (see page 11 -309).
2. Reinstall the fuel tank unit without connecting the fuel
tank unit 4P connector and the quick-connect fitting
(see page 11-321).
3. Remove the fue ...