 Honda Accord: Gauge Control Module Replacement
NOTE: Before replacing the gauge control module, rewriting the ODO data and transferring the maintenance minder data to a new gauge control module (see page 22-350).
1. Remove the instrument visor (see page 20-165).
2. Remove the three screws from the gauge control module (A).
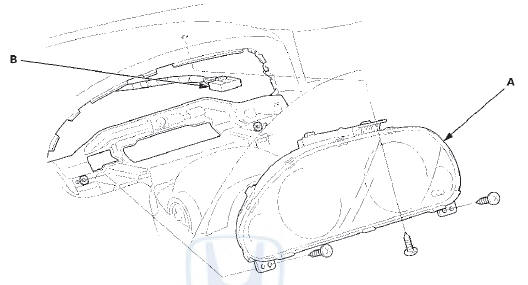
3. Disconnect the 32P connector (B) from the gauge control module.
4. Install the gauge control module in the reverse order of removal.
5. Rewriting the ODO data and transfer the maintenance minder data to a new gauge control module (see page 22-350).
 Rewriting the ODO Data and
Transferring the Maintenance
Minder Data to a New Gauge Control
Module
Rewriting the ODO Data and
Transferring the Maintenance
Minder Data to a New Gauge Control
Module
NOTE:
• Obtain a new gauge control module before starting
the rewriting process. Only new gauges can be
rewritten.
• Rewriting is not possible on a gauge control module
that will not ...
 Outside Air Temperature indicator
Calibration
Outside Air Temperature indicator
Calibration
NOTE: To test the outside air temperature sensor (see
page 21-185).
Description
The outside air temperature sensor is located behind the
center of the front bumper. The gauge control module
uses ...
See also:
Changing the Folders
While playing an MP3/WMA disc,
you can select a folder within the
disc by pressing either side of the
category bar. Each time you press
either side of the bar, the folder title
and its first ...
Opening and Closing the Windows
Opening/Closing the Power Windows
The power windows can be opened and closed when the ignition switch is in ON
, using the switches on the doors.
The driver's side switches can be used to
open ...
A/C Signal Circuit Troubleshooting
1. Start the engine, and let it idle.
2. Turn the blower switch on.
3. Turn the A/C switch on.
4. Check the A/C CLUTCH in the DATA LIST with the
HDS.
Does it indicate ON?
YES-Go to step ...