 Honda Accord: Gauge Control Module Input Test
NOTE: Before testing, do the gauge control module self-diagnosis function (see page 22-332), and make sure the B-CAN communication lines are OK.
1. Turn the ignition switch to LOCK (0).
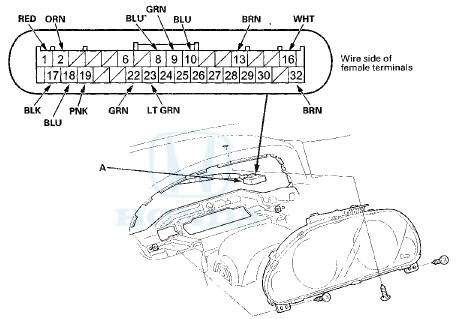
2. Remove the gauge control module (see page 22-351), and disconnect the 32P connector (A) from it
GAUGE CONTROL MODULE 32P CONNECTOR

*: Canada models
3. Inspect the connector and socket terminals to be sure they are all making good contact.
• If the terminals are bent, loose or corroded, repair them as necessary, and recheck the system.
• If the terminals are OK, go to step 4.
4. With the connector still disconnected, do these input tests at the following connector.
• If any test indicates a problem, find and correct the cause, then recheck the system.
• If all the input tests prove OK, go to step 5.

5. Reconnect the 32P connector to the gauge control module, and do these input tests at the following connector.
• If any test Indicates a problem, find and correct the cause, then recheck the system.
• If the input test proves OK, the gauge control module must be faulty; replace it (see page 22-351).

*: Canada models
 DTC Troubleshooting
DTC 81152: Gauge Control Module (EEPROM)
Error
NOTE: If you are troubleshooting multiple DTCs, be sure
to follow the instructions in B-CAN System Diagnosis
Test Mode A (see page 22-134).
1. Cle ...
 Rewriting the ODO Data and
Transferring the Maintenance
Minder Data to a New Gauge Control
Module
NOTE:
• Obtain a new gauge control module before starting
the rewriting process. Only new gauges can be
rewritten.
• Rewriting is not possible on a gauge control module
that will not ...
See also:
Installing a Child Seat with LATCH
Your vehicle is equipped with
LATCH (Lower Anchors and
Tethers for CHildren) at the outer
rear seats.
The lower anchors are located
between the seat-back and seat
bottom, and are to be used ...
Playing a CD
Your audio system supports audio CDs, CD-Rs and CD-RWs in either MP3, WMA, or
AAC*1 format. With the CD loaded, select the CD mode.
• How to Select a File from the Music Search List
(MP3/WMA/ ...
Wheel Speed Sensor Replacement
Front
1. Turn the ignition switch to LOCK (0).
2. Release the clamp (A), then disconnect the wheel speed sensor connector (B).
3. Remove the bolts and the wheel speed sensor (C).
4. Install ...
