 Honda Accord: Fuel Line/Quick-Connect Fitting
Removal
Honda Accord: Fuel Line/Quick-Connect Fitting
Removal
NOTE: Before you work on the fuel lines and fittings, read the Fuel Line/Quick-Connect Fitting Precautions (see page 11-313).
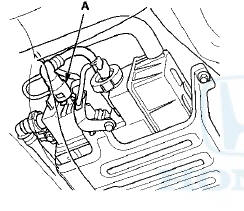
1. If equipped, remove the quick-connect fitting cover from the fuel line. Raise the cover (A) from the fuel line (B), and remove it as shown.
2. Relieve the fuel pressure (see page 11 -306).
3. Check the fuel quick-connect fittings (A) for dirt, and clean them if needed.
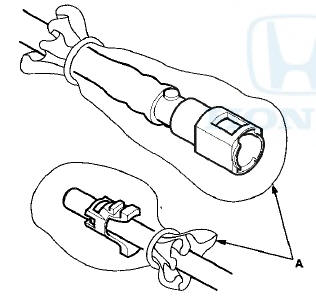
4. Place a rag or shop towel over the quick-connect fitting. Hold the connector (A) with one hand, and squeeze the retainer tabs (B) with the other hand to release them from the locking tabs (C). Pull the connector off.
NOTE: - Be careful not to damage the line (D) or other parts.
Do not use tools.
- If the connector does not move, keep the retainer tabs pressed down, and alternately pull and push the connector until it comes off easily.
- Do not remove the retainer from the line; once removed, the retainer must be replaced with a new one.
6. To prevent damage and keep foreign matter out, cover the disconnected connector and line ends with plastic bags (A).
NOTE: The retainer cannot be reused once it has been removed from the line.
Replace the retainer when: - replacing the fuel rail.
- replacing the fuel line.
- replacing the fuel pump.
- replacing the fuel filter.
- replacing the EVAP canister.
- replacing the fuel fill pipe.
- replacing the fuel tank.
- it has been removed from the line.
- it is damaged.
 Fuel Line/Quick-Connect Fitting
Precautions
Fuel Line/Quick-Connect Fitting
Precautions
The fuel line/quick-connect fittings (A, B, C, D, E, and F)
connect the fuel rail (G) to the fuel feed hose (H), the fuel
feed hose to the fuel line (I), the fuel line (J) to the fuel
tank unit (K) ...
 Fuel Line/Quick-Connect Fitting
Installation
Fuel Line/Quick-Connect Fitting
Installation
NOTE: Before you work on the fuel lines and fittings,
read the Fuel Line/Quick-Connect Fitting Precautions
(see page 11-313).
1. Check the contact area (A) of the line (B) for dirt or
damage, an ...
See also:
Mainshaft Bearing and Oil Seal Replacement
Special Tools Required
- Oil Seal Driver, 65 07JAD-PL90100
- Adjustable Bearing Puller, 20-”40 mm 07736-A01000B
- Bearing Driver Attachment, 42 x 47 07746-0010300
- Driver Handle, 15 x 135L ...
How the SRS Indicator Works
The SRS indicator alerts you to a
potential problem with your airbag
system components.
When you turn the ignition switch to
the ON (II) position, this indicator
comes on briefly then goes ...
Playing a CD
Your audio system supports audio CDs, CD-Rs and CD-RWs in either MP3, WMA, or
AAC*1 format. With the CD loaded, press the CD button.
• How to Select a File from the Music Search List
(MP3/WMA ...