 Honda Accord: Front Splash Shield Replacement
NOTE: - Put on gloves to protect your hands.
- Take care not to scratch the body.
- When prying with a flat-tip screwdriver, wrap it with protective tape to prevent damage.
- 4-door is shown; 2-door is similar.
1. Remove the front wheel.
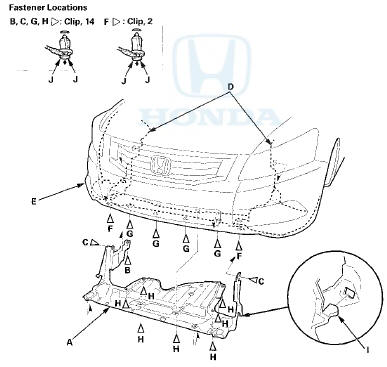
2. Remove the front splash shield (A).
-1. Detach the clip (B) that secures the front splash shield to the body.
-2. Detach the clips (C) that secure the front inner fender (D) and the front splash shield to the body.
-3. From under the front bumper (E), detach the clips (F) that secure the front bumper, the front inner fender, and the front splash shield to the body.
-4. From under the front bumper, detach the clips (G) that secure the front bumper and the front splash shield to the body.
-5. From under the body, detach the clips (H) that secure the front splash shield to the front subframe.
-6. Release the hooks (I) of the front splash shield, then pull out the splash shield.
NOTE: To release the clips, pry up on the center pin at the notch (J).
3, Install the splash shield in the reverse order of removal, and note these items: - If the clips are damaged or stress-whitened, replace them with new ones.
- Push the clips and the hooks into place securely.
 Front Inner Fender Replacement
NOTE:
- Put on gloves to protect your hands.
- Take care not to scratch the body.
- When prying with a flat-tip screwdriver, wrap it with protective tape to
prevent damage.
1. Remove the f ...
 Front Fender Fairing Replacement
For Some Models
NOTE;
- Take care not to scratch the body.
- Put on gloves to protect your hands.
1. Remove the front Inner fender as needed (see page
20-290).
2. From the wheel arch, rele ...
See also:
Sunglasses Holder
To open the sunglasses holder, push
then release the indent. It will
unlatch and swing down. To close it,
push it until it latches. Make sure the
holder is closed while you are driving.
S ...
Circuit Diagram
...
Trunk Pass-through Lid Lock Cylinder
Replacement
Special Tools Required
KTC Trim Tool Set SOJATP2014*
*Available through the Honda Tool and
Equipment
Program; call 888-424-6857
4-door
NOTE:
- Take care not to scratch the trunk pass-through l ...