 Honda Accord: Front Seat Lumbar Support
Replacement
Honda Accord: Front Seat Lumbar Support
Replacement
2-door Driver's Seat
SRS components are located In this area. Review the SRS component locations (see page 24-23) and the precautions and procedures (see page 24-25) before doing repairs or service.
NOTE: - Put on gloves to protect your hands.
- Take care not to kink the cable.
- Take care not to tear or damage the seat covers.
1. Remove the front seat (see page 20-194).
2. Remove the back cover/pad (see page 20-213).
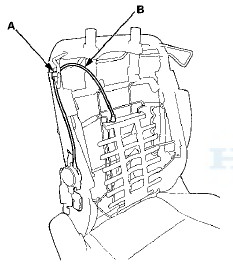
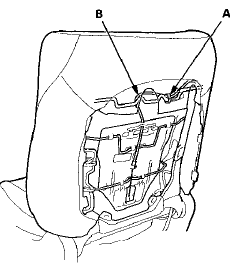
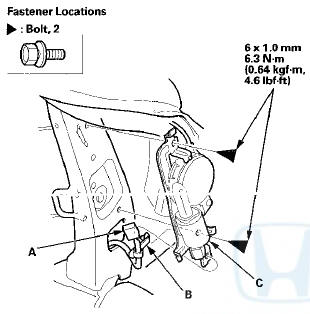
3. Remove the cable clamp (A) fastening the lumbar support cable (B).
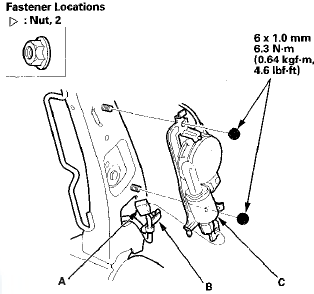
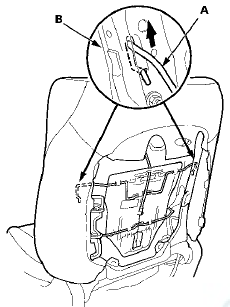
4. Disconnect the lumbar support motor connector (A), and detach the harness clip (B). Remove the nuts, then remove the lumbar support motor (C).
5. Remove the lumbar support (A).
-1. While pulling the lower part of the lumbar support to one side of the seat back frame, release it from the lower wire (B).
-2. Release an opposite side of the lumbar support from the other lower wire.
-3. Release the upper part of the lumbar support from both upper springs (C).
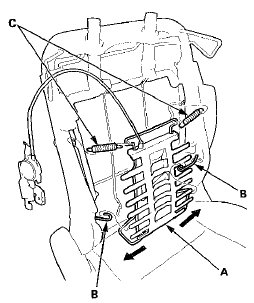
6. Remove the upper springs.
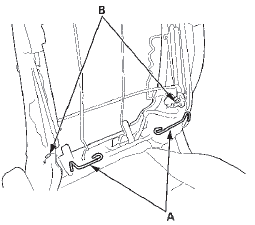
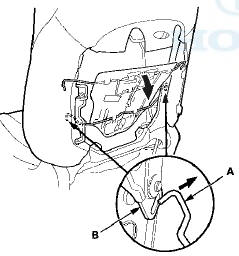
7. Release the lower wire (A) from both active head restraint links (B) of the seat-back frame.
8. Install the lumbar support in the reverse order of removal, and make sure the connector is plugged in properly.
4-door Driver's Seat (For Some Models)
SRS components are located in this area. Review the SRS component locations (see page 24-21) and the precautions and procedures (see page 24-25) before doing repairs or service.
NOTE: - Put on gloves to protect your hands.
m Take care not to kink the cable.
- Take care not to tear or damage the seat covers.
1. Remove the front seat (see page 20-194).
2. Remove the back panel (see step 3 on page 20-221).
3. Release the hook strips as needed, then turn over the seat-back cover (see step 5 on page 20-222).
4. Remove the cable band (A) fastening the lumbar support cable (B).
5. Release the upper wire (A) from both seat-back side frames (B) inside the seat-back.
6. Release the lower wire (A) from both active head restraint links (B) inside the seat-back.
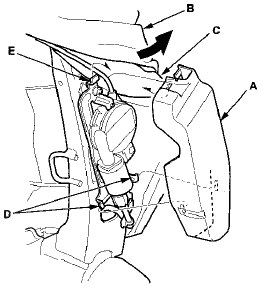
7. Remove the lumbar support motor cover (A).
-1. Turn over the seat-back cover (B) and the pad (C) as needed.
-2. Release the cover from the lower hooks (D).
-3. Pull the cover upward to release it from the upper hook (E).
8. Disconnect the lumbar support motor connector (A), and detach the harness clip (B). Remove the bolts, and separate the lumbar support motoric) from the frame, then remove the lumbar support.
9. Install the lumbar support in the reverse order of removal, and note these items: - Make sure the connector is plugged in properly.
- To prevent wrinkles when installing a seat-back cover, make sure the material is stretched evenly over the pad before securing the hook strips.
 Front Seat Recline Motor Replacement
Driver's Seat (10-way Power Seat)
SRS components are located in this area. Review the
SRS component locations, 2-door (see page 24-23),
4-door (see page 24-21) and the precautions and
procedures ( ...
 Front Seat Slide Motor Replacement
SRS components are located in this area. Review the
SRS component locations, 2-door (see page 24-23),
4-door (see page 24-21) and the precautions and
procedures (see page 24-25) before doing repair ...
See also:
Ball Joint Boot Inspection / Replacemen
Special Tools Required
- Clip Guide, 45 mm 070AG-SJA0300
-Clip Guide, 41 mm 07974-SA50700
1. Check the ball joint boot for weakness, damage,
cracks, and grease leaks.
NOTE:
- If the ball joint ...
Symptom Troubleshooting
Hard Steering
NOTE:
-Compare to a known-good vehicle that is the same
trim level.
-Check for suspension damage.
m Check the steering alignment.
-Check the tire condition and pressure.
1 ...
SRS Unit Update
Special Tools Required
• Honda Diagnostic System (HDS) tablet tester
• Honda Interface Module (HIM) and an iN workstation
with the latest HDS software version
• HDS pocket tester
Ð ...