
 Honda Accord: Front Passenger's Power Window
Switch input Test
Honda Accord: Front Passenger's Power Window
Switch input Test
1. Turn the ignition switch to LOCK (0), open and close the driver's door, then remove the front passenger's (passenger's) power window switch.
- • 4-door (see page 22-306) • 2-door (see page 22-307) 2. Disconnect the 37P connector (A) from the front passenger's (passenger's) power window switch (B).
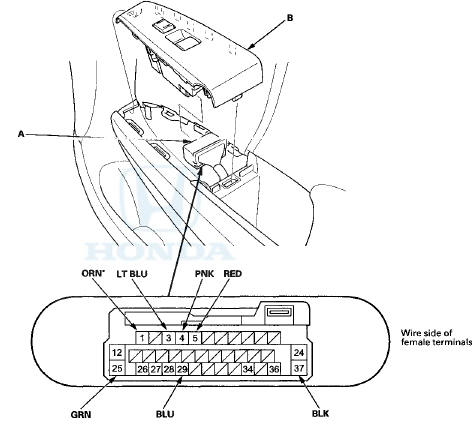
*: With mirror defogger
3. Inspect the connector and socket terminals to be sure they are all making good contact.
• If the terminals are bent, loose, or corroded, repair them as necessary, and recheck the system.
• If the terminals look OK, go to step 4.
4. Reconnect the connector to the front passenger's power window switch/turn the ignition switch to ON (11), and do these input tests at the following connector.
• If any test indicates a problem, find and correct the cause, then recheck the system.
• If all the input tests prove OK, go to step 5.
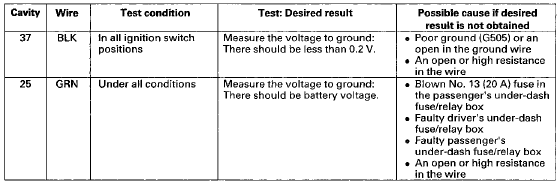
5. Turn the ignition switch to LOCK (0), open and close the driver's door, then disconnect the 37P connector from the front passenger's power window switch again.
6. With the connector still disconnected, do these input tests at the following connector.
• If any test indicates a problem, find and correct the cause, then recheck the system.
• If all the input tests prove OK, replace the front passenger's power window switch, and go to step 7.
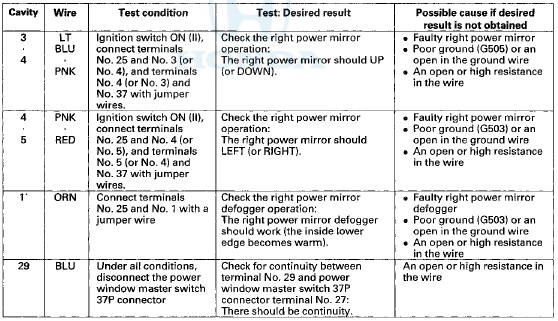
*: With mirror defogger
7. With the front passenger's power window AUTO UP/AUTO DOWN function, reset the power window control unit (see page 22-280).
 Power Window Master Switch Input
Test
Power Window Master Switch Input
Test
NOTE: Before testing, troubleshoot the multiplex Integrated control unit
first, using B-CAN System Diagnosis Test Mode
A (see page 22-134).
1. Turn the ignition switch to LOCK (0), open and clos ...
 Power Mirror Switch
Test/Replacement
Power Mirror Switch
Test/Replacement
1. Remove the power window master switch.
• 4-door (see page 22-305)
• 2-door (see page 22-306)
2. Disconnect the 13P connector from the power mirror
switch (A).
3. Check for contin ...
See also:
To Play a Disc
Select the changer by pressing the
CD button. The system will begin
playing the last selected disc in the
disc changer. You will see the
current disc position highlighted.
To select a diffe ...
Headlight Bulbs
When replacing, use the following bulbs.
• High Beam Headlight
1. Unlock the holding clips, then remove the
upper part of the air intake duct and the air
intake tube.
2. Push the ta ...
Rear Door Sash Inner Trim
Replacement
4-door
NOTE: Take care not to scratch the door.
1. Remove the door panel (see page 20-38).
2. Lower the glass fully.
3. Remove the door sash inner trim (A).
-1. Pull back the outside edge ...