 Honda Accord: Front Individual Map Light
Test/Replacement
Honda Accord: Front Individual Map Light
Test/Replacement
With moonroof
1. Turn the map light switch OFF.
2. Carefully pry the lens ( A ) off with a small screwdriver.
Individual Map Light: 8 W x 2
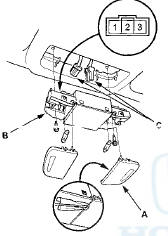
3 . Remove the screws, then remove the individual map lights (B).
4. Disconnect the connectors (C) f r om the map lights.
5. Check for continuity between the terminals in each switch position according to the table.
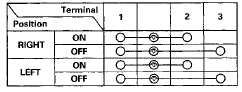
6. If the continuity is not as specified, check the bulb(s). If the bulb(s) are OK, replace the map light.
7. Install the light in the reverse order of removal.
Without moonroof
1. Turn the map light switch OFF.
2. Carefully pry the lens (A) off with a small screwdriver.
Individual Map Light: 8 W x 2
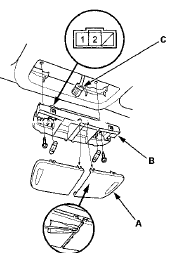
3 . Remove the screws, then remove the individual map lights (B).
4. Disconnect the connector (C) f r om the map lights.
5. Check for continuity between the terminals.
• There should be continuity between terminals No. 1 and No. 2 with the switch in the ON position.
• There should be no continuity between terminals No. 1 and No. 2 with the switch in the OFF position.
6. If the continuity is not as specified, check the bulb. If the bulb is OK, replace the map light.
7. Install the light in the reverse order of removal.
 Circuit Diagram
...
 Ceiling Light Test/Replacement
1. Turn the celling light switch OFF.
2. Carefully pry the lens (A) off with a small screwdriver.
2. Carefully pry the lens (A) off with a small screwdriver.
Celling Light 8 W
3. Remove the ...
See also:
Door Striker Adjustment
Make sure the door latches securely without slamming
it. If necessary, adjust the striker (A): The striker nuts are
fixed, but the striker can be adjusted slightly up or down,
and in or out.
1. ...
ATF Temperature Sensor
Test/Replacement
1. Raise the vehicle on a lift, or apply the parking brake,
block both rear wheels, and raise the front of the
vehicle. Make sure it is securely supported.
2. Remove the splash shield.
3. Disc ...
Carrier Bearing Outer Race
Replacement
Special Tools Required
-Driver Handle, 15 x 135L 07749-0010000
-Attachment, 78 x 80 mm 07NAD-PX40100
-Attachment, 72 x 75 mm 07746-0010600
NOTE:
-The bearing and the bearing outer race should be
...