 Honda Accord: Front HFL-Navigation-ANC
Microphone
Removal/Installation
Honda Accord: Front HFL-Navigation-ANC
Microphone
Removal/Installation
NOTE: • Put on gloves to protect your hands.
• Take care not to scratch the dashboard and related parts.
• Lay a workshop towel under the parts when working on them to protect the face panel from scratches or other damage.
1. Remove the roof console (see page 20-140), and disconnect the connector (A) from the front HFL-navigation-ANC microphone (B).
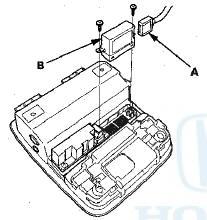
2. Remove the screws and the front HFL-navigation-ANC microphone.
3. Install the microphone in the reverse order of removal.
 Interface Dial
Removal/Installation
Interface Dial
Removal/Installation
1. Remove the audio unit (see page 23-114).
2. Remove the screw and harness cover (A).
3. Disconnect the interface dial connector (A). Remove
the screws and interface dial (B).
NOTE: If the ...
 GPS Antenna
Removal/Installation
GPS Antenna
Removal/Installation
1. Remove the rear shelf (see page 20-128).
2. Disconnect the GPS antenna connector (A), and
remove the bolt (B).
3. Detach the harness clips, and remove the GPS
antenna (C).
4. Install the ...
See also:
Shift Fork Clearance Inspection
1. Measure the clearance between each shift fork (A)
and its matching synchro sleeve (B). If the clearance
exceeds the service limit, go to step 2.
Standard: 0.35-0.65 mm (0.014-0.026 inj
Service ...
All ChildrenMust Be Restrained
Each year, many children are injured
or killed in vehicle crashes because
they are either unrestrained or not
properly restrained. In fact, traffic
collisions are the number one cause
of dea ...
Air Conditioning
...