 Honda Accord: Front Grille Replacement
Special Tools Required
KTC Trim Tool Set SOJATP2014*
* Available through the Honda Tool and Equipment Program; call 888-424-6857
Grille Replacement - 2-door
NOTE: - Take care not to scratch the front bumper, - When prying with a flat-tip screwdriver, wrap it with protective tape to prevent damage.
1. Remove the front bumper (see page 20-255).
2. Remove the front grille (A).
-1. Detach the clips.
-2. Release the hooks (B) and the ribs (C) from the front bumper (D).
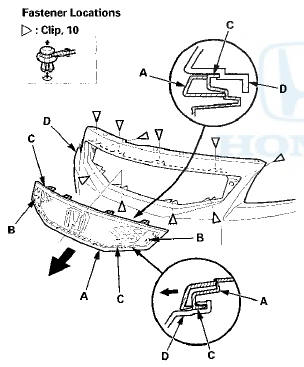
3. Install the grille in the reverse order of removal, and note these items: - If the clips are damaged or stress-whitened, replace them with new ones.
- Push the clips and the hooks into place securely.
Grille Replacement - 4-door
NOTE: - Take care not to scratch the front bumper or the body.
When prying with a flat-tip screwdriver, wrap it with protective tape to prevent damage.
1. Remove the front grille cover (see page 20-274).
2. Remove the front grille (A).
-1. Detach the clips.
-2. Release the hooks (B) and the ribs (C) from the front bumper (D).
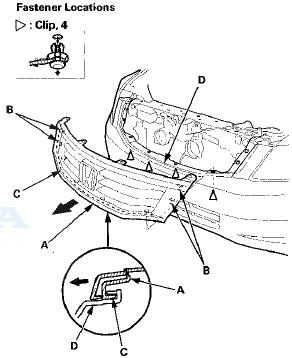
3. Install the grille in the reverse order of removal, and note these items: - If the clips are damaged or stress-whitened, replace . them with new ones.
- Push the clips and the hooks into place securely.
Molding Replacement - 2-door
NOTE; - Take care not to scratch the front grille.
- When prying with a flat-tip screwdriver, wrap it with protective tape to prevent damage.
1. Remove the front grille.
2. Remove the screws, and release the two hooks (A) with a flat-tip screwdriver, then remove the front grille molding (B) from the front grille base (C).
3. Install the molding in the reverse order of removal, and push the hooks into place securely.
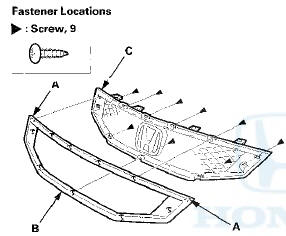
Molding Replacement - 4-door
NOTE: - Take care not to scratch the front grille.
- When prying with a flat-tip screwdriver, wrap it with protective tape to prevent damage.
1. Remove the front grille.
2. Remove the screw, and release the hooks (22 places) (A) with a flat-tip screwdriver, then remove the front grille molding (B) from the front grille base (C).
3. Install the molding in the reverse order of removal, and push the hooks into place securely.
 Front Grille Cover Replacement
2-door
NOTE:
- Take care not to scratch the front grille or the body.
- When prying with a flat-tip screwdriver, wrap it with
protective tape to prevent damage.
1. Remove the front grille cov ...
 Front Fender Trim Replacement
2-door
NOTE:
- Take care not to scratch the front grille cover or the
body.
- When prying with a flat-tip screwdriver, wrap it with
protective tape to prevent damage.
- The left side is show ...
See also:
A/C System Test
Performance Test
• Air conditioning refrigerant or lubricant vapor can
irritate your eyes, nose, or throat.
•Be careful when connecting service
equipment.
• Do not breathe ref ...
Dashboard
With Navigation System
Without Navigation System
...
Alternator FR Signal Circuit
Troubleshooting
1. Start the engine, and let it idle.
2. Monitor the ALTERNATOR in the DATA LIST with the
HDS.
3. Check if the indicated percentage varies when the
headlight switch is turned on.
Does the p ...