 Honda Accord: Evaporator Temperature Sensor Test
NOTE: Before testing the sensor, check for HVAC DTCs (see page 2 1 - 9).
1. Remove the evaporator temperature sensor (see page 21-67).
2. Dip the sensor in ice water, and measure the resistance between its terminals.
EVAPORATOR TEMPERATURE SENSOR
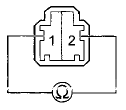
Terminal side of male terminals
3. Pour warm water on the sensor, and check for a change in the resistance.
4. Compare the resistance readings with the specifications shown in the graph; the resistance should be within the specifications.
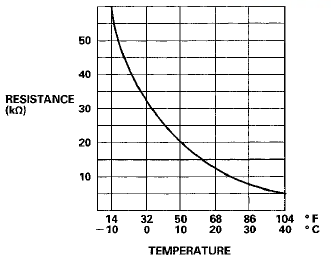
5. If the resistance is not as specified, replace the evaporator temperature sensor (see page 21-67).
 A/C Signal Circuit Troubleshooting
NOTE:
• If the blower motor does not run at all speeds, the A/C
compressor will be inoperative. Run the
self-diagnostic function, and check for DTC 12. Before
performing any other troubleshoo ...
 Power Transistor Test
1. Remove the passenger's dashboard undercover (see
page 20-170).
2. Disconnect the 4P connector from the power
transistor.
3. Measure the resistance between terminals No. 3 and
No. 4 of the ...
See also:
Rearview Mirror Replacement
Without Automatic Dimming Mirror
1. Turn the rearview mirror base (A) 90 В°.
2. Slide the rearview mirror base (A) down toward the
bottom of the windshield to detach it from the spring
(B) in ...
Clutch Wave-plate Phase Difference
Inspection
1. Place the clutch wave-plate (A) on a surface plate, and
set a dial indicator (B) on the wave-plate.
2. Find the bottom (C) of a phase difference of the
wave-plate, zero the dial indicator an ...
DTC Troubleshooting
DTC 11-13: Right-front Wheel Speed Sensor
Circuit Malfunction
DTC 13-13; Left-front Wheel Speed Sensor
Circuit Malfunction
DTC 15-13: Right-rear Wheel Speed Sensor
Circuit Malfunction
DTC 17-13: ...