 Honda Accord: ELD Replacement
1. Do the battery terminal disconnection procedure (see page 22-91).
2. Remove the upper cover (A), then remove the two positive ( + ) terminals (B).
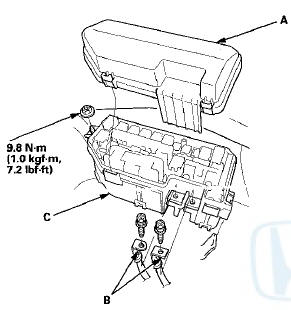
3. Remove the under-hood fuse/relay box (C) from the bracket.
4. Remove the lower cover (A).
5. Disconnect the ELD 3P connector (B).
6. Remove the fuses (A) and (B).

7. Release the three lock tabs (A), then remove the ELD (B).
8. Install the parts in the reverse order of removal.
9. Do the battery terminal reconnection procedure (see page 22-91).
 Knock Sensor Replacement
1. Remove the intake manifold (see page 9-4).
2. Disconnect the knock sensor connector (A).
3. Remove the knock sensor (B).
4. Install the parts in the reverse order of removal. ...
 ECM/PCM Update
Special Tools Required
- Honda diagnostic system (HDS) tablet tester
- Honda Interface Module (HIM) and an iN workstation
with the latest HDS software version
- HDS pocket tester ...
See also:
Idler Gear/Idler Gear Shaft
Replacement
Special Tools Required
-Driver Handle, 15 x 135L 07749-0010000
-Attachment, 32 x 35 mm 07746-0010100
1. Remove the snap ring from the idler gear/idler shaft
assembly. Do not distort the snap ring. ...
Door Striker Adjustment
Make sure the door latches securely without slamming
it. If necessary, adjust the striker (A): The striker nuts are
fixed, but the striker can be adjusted slightly up or down,
and in or out.
1. ...
Driveshaft Disassembly
Special'Tools Required
•Threaded Adapter, 26 x 1.5 mm
07XAC-001030A
-Slide Hammer 5/8M-18 UNF, commercially available
-Bearing Puller, commercially available
-Boot Band Pliers, commercially ...