 Honda Accord: DVD-ROM Replacement
NOTE: • Check any official Honda service website for more service information about the navigation system and software updates.
• Do not replace the DVD to give a customer a preview of an update DVD.
1. Turn the ignition switch to ON (II).
2. Push the open button (A) of the navigation unit located on the left side of the trunk.
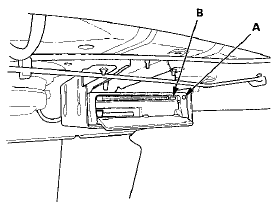
3. Press the EJECT button (B).
4. Remove the DVD
5. Insert the new DVD with the label facing up.
6. Close the front cover. Do not turn the ignition switch to LOCK (0); watch the navigation screen until the data is downloaded to the navigation unit.
7. Do the Map Matching (see page 23-133).
NOTE: After servicing, the front cover and PC card slot door must be closed. If you start up the navigation system with the front cover or PC card slot door open, the display will indicate an error message.
 Forced Starting of Display
Special Tools Required
SCS Service Connector 07PAZ-0010100
1. Turn the ignition switch to LOCK (0).
2. Connect the SCS service connector (A) to the
navigation service connector (B) located behin ...
 Navigation Unit
Removal/Installation
Navigation Unit
Removal/Installation
NOTE:
• Before you replace the navigation unit, back-up the
customer data using system diagnostic mode Save
Users Memory under the Functional Set up (see page
23-186).
• Ifthe navigat ...
See also:
Changing the Wiper Blade Rubber
1. Lift the driver side wiper arm first, then the
passenger side.
2. Press and hold the tab, then slide the blade
from the wiper arm.
NOTICE
Avoid dropping the wiper arm; it may damage the ...
Symptom Troubleshooting
The horn does not sound and/or the
headlights do not flash when the PANIC
button on the transmitter is pressed
NOTE: Before troubleshooting, check the B-CAN DTCs.
any DTCs are indicated, and trou ...
System Description
VSA Modulator-Control Unit Inputs and Outputs for 36P Connector (Connector
Disconnected
Wire side of female terminals.
System Outline
This system i s composed of the VSA modulator-control u ...