 Honda Accord: DTC Troubleshooting
DTC B112S;
Driver's Power Window Motor A Pulse Malfunction
DTC B1126:
Driver's Power Window Motor B Pulse Malfunction
NOTE: If you are troubleshooting multiple DTCs, be sure to follow the instructions in B-CAN System Diagnosis Test Mode A (see page 22-134).
1. Clear the DTCs with the HDS.
2. Turn the ignition switch to LOCK (0) and then back to ON (II).
3. Open and close the driver's power window by using the power window master switch manually.
Does the window motor operate? YES
-Go to step 4.
NO
-Test the driver's power window motor (see page 22-299). If the motor tests OK, go to step 4.
4. Check for DTCs with the HDS.
Are DTCs B1125 and/or B1126 indicated? YES
-Go to step 5.
NO
-lntermittent failure, the system is OK at this time.
Check for loose or poor connections.
5. Select the POWER WINDOWS from the BODY ELECTRICAL system select menu, and enter the DATA LIST.
6. Check the DETECT/NONE information of the driver's window motor A-phase and B-phase signal in the DATA LIST.
Does the information indicator display DETECT while the window is moving, and display NONE when the window is stopped? YES
-Replace the power window master switch, 4-door (see page 22-305), 2-door (see page 22-306).
NO
-Go to step 7.
7. Turn the ignition switch to LOCK (0).
8. Disconnect the door multiplex control unit 37P connector.
9. Disconnect the driver's power window motor 6P connector.
10. Check for continuity between the door multiplex control unit 37P connector terminals and driver's power window motor 6P connector terminals as shown:
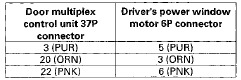
DOOR MULTIPLEX CONTROL UNIT 37P CONNECTOR
Wire side of female terminals
DRIVER'S POWER WINDOW MOTOR 6P CONNECTOR
Wire side of female terminals
Is there continuity? YES
-Go to step 11.
NO
-Repair an open or high resistance in the wire between the door multiplex control unit and the driver's power window motor.
11. Check for continuity between driver's power window motor 6P connector terminals No. 3, No. 5, and No. 6 and body ground individually.
DRIVER'S POWER WINDOW MOTOR 6P CONNECTOR
Wire side of female terminals
Is there continuity? YES
-Repair a short to ground in the w i r e .
NO
-Goto step 12.
12. Test the driver's power window motor (see page 22-299).
Is the motor OK? YES
-Replace the power window master switch, 4-door (see page 22-305), 2-door (see page 22-306).
NO
-Replace the driver's power window motor.
DTC B1130:
Front Passenger's Power Window Motor A Pulse Malfunction
DTC B1131:
Front Passenger's Power Window Motor B Pulse Malfunction
NOTE: If you are troubleshooting multiple DTCs, be sure to follow the instructions in B-CAN System Diagnosis Test Mode A (see page 22-134).
1. Clear the DTCs with the HDS.
2. Turn the ignition switch to LOCK (0) and then back to ON (II).
3. Open and close the front passenger's power window by using the front passenger's power window switch manually.
Does the window motor operate? YES
-Go to step 4.
NO
-Test the front passenger's power window motor (see page 22-301). If the motor tests OK, go to step 4.
4. Check for DTCs with the HDS.
Are DTCs B1130 and/or B1131 indicated? YES-
Go to step 5.
NO
-lntermittent failure, the system is OK at this time.
Check for loose or poor connections.
5. Select the POWER WINDOWS from the BODY ELECTRICAL system select menu, and enter the DATA LIST.
6. Check the DETECT/NONE information of the front passenger's window motor A-phase and B-phase signal in the DATA LIST.
Does the information indicator display DETECT while the windows is moving, and display NONE when the window is stopped? YES
-Replace the front passenger's power window switch, 4-door (see page 22-306), 2-door (see page 22-307).
NO
-Go to step 7.
7. Turn the ignition switch to LOCK (0).
8. Disconnect the front passenger's power window switch 37P connector.
9. Disconnect the front passenger's power window motor 6P connector.
10. Check for continuity between the front passenger's power window switch 37P connector terminals and front passenger's power window motor 6P connector terminals as shown:
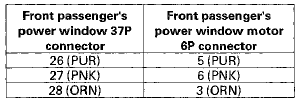
FRONT PASSENGERS POWER WINDOW SWITCH 37P CONNECTOR
Wire side of female terminals
FRONT PASSENGER'S POWER WINDOW MOTOR 6P CONNECTOR
Wire side of female terminals
Is there continuity? YES
-Go to step 11.
NO-
Repair an open in the wire between the front passenger's power window switch and the front passenger's power window motor.
11. Check for continuity between front passenger's power window motor 6P connector terminals No. 3, No. 5, and No.6 and body ground individually.
FRONT PASSENGER'S POWER WINDOW MOTOR 6P CONNECTOR

Wire side of female terminals
Is there continuity? YES
-Repair a short to ground in the wire.
NO
-Go to step 12.
12. Test the front passenger's power window motor (see page 22-301).
Is the motor OK? YES
-Replace the front passenger's power window switch, 4-door (see page 22-306), 2-door (see page 22-307).
NO
-Replace the front passenger's power window motor.
DTC B1140:
Driver's Power Window Position Detect Circuit Malfunction
NOTE: If you are troubleshooting multiple DTCs, be sure to follow the instructions in B-CAN System Diagnosis Test Mode A (see page 22-134).
1. Clear the DTCs with the HDS.
2. Turn the ignition switch to LOCK (0), and then back to ON (II).
3. Open and close the driver's power window by using the driver's switch manually.
4. Check for DTCs with the HDS.
Are DTCs B1125 or B1126 indicated? YES
-Troubleshoot the DTC B1125 or B1126 (see page 22-285).
NO
-Go to step 5.
5. Reset the power window control unit (see page 22-280).
6. Check for DTCs again with the HDS.
Is DTC B1140 indicated? YES
-Go to step 7.
NO
-The system is recovered at this t i m e . 7. Substitute a known-good power window master switch.
8. Open and close the driver's power window by using the driver's switch manually.
9. Check for DTCs with the HDS.
Is DTC B1140 indicated? YES
-Faulty driver's power window motor; replace i t .
NO
~Faulty door multiplex control unit; replace the power window master switch, 4-door (see page 22-305), 2-door (see page 22-306).
DTC B1142:
Door Multiplex Control Unit Lost Communication With Front Passenger's Power Window Switch (UART Line Open)
NOTE: If you are troubleshooting multiple DTCs, be sure to follow the instructions in B-CAN System Diagnosis Test Mode A (see page 22-134).
1. Clear the DTCs with the HDS.
2. Turn the ignition switch to LOCK (0) and then back to ON (II).
3. Open and close the driver's and front passenger's windows by operating the power window master switch.
4. Check for DTCs with the HDS.
Is DTC B1142 indicated? YES-
Go to step 5.
NO-
lntermittent failure, the system is OK at this time.
5. Turn the ignition switch to LOCK (0).
6. Disconnect the door multiplex control unit 37P connector.
7. Disconnect the front passenger's power window switch 37P connector.
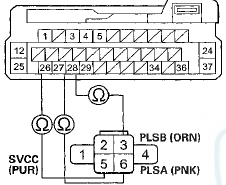
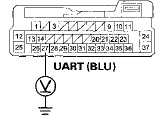
8. Check for continuity between door multiplex control unit 37P connector terminal No. 27 and body ground.
DOOR MULTIPLEX CONTROL UNIT 37P CONNECTOR

Wire side of female terminals
Is there continuity? YES
-Repair a short to ground in the wire.iiiii NO
-Go to step 9.
9. Check for continuity between door multiplex control unit 37P connectorterminal No. 27 and front passenger's power window switch 37P connector terminal No. 29.
DOOR MULTIPLEX CONTROL UNIT 37P CONNECTOR
Wire side of female terminals
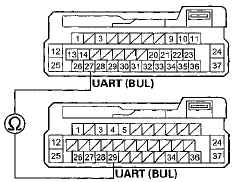
FRONT PASSENGERS POWER WINDOW SWITCH 37P CONNECTOR
Wire side of female terminals
Is there continuity? YES
-Go to step 10.
NO
-Repair an open or high resistance in the wire.
10. Turn the ignition switch to ON (II).
11 Measure the voltage between door multiplex control unit 37P connectorterminal No. 27 and body ground.
DOOR MULTIPLEX CONTROL UNIT 37P CONNECTOR
Wire side of female terminals
Is there less than 0.2 V? YES-
Go to the passenger's power window switch input test, and do all the power and ground input tests (see page 22-296). If the tests prove OK, substitute a known good passenger's power window switch. If the DTC goes away, replace the original passenger's power window switch. If the DTC is still present, replace the power window master switch, for 4-door (see page 22-305), for 2-door (see page 22-306).
NO
-Repair a short to power in the wire.
DTC B1145:
Front Passenger's Power Window Position Detect Circuit Error
NOTE: If you are troubleshooting multiple DTCs, be sure to follow the instructions in B-CAN System Diagnosis Test Mode A (see page 22-134).
1. Clear the DTC with the HDS.
2. Turn the ignition switch to LOCK (0), and then back to ON (II).
3. Open and close the front passenger's power window by using the front passenger's switch manually.
4. Check for DTCs with the HDS.
Are DTCs B1130 or B1131 indicated? YES
-Troubleshoot the DTC B1130 or B1131 (see page 22-286).
NO
-Go to step 5.
5. Reset the power window control unit and the front passenger's power window control unit (see page 22-280).
6. Check for DTCs again with the HDS.
Is DTC B1145 indicated? YES
-Go to step 7.
NO
-The system is recovered at this time.
7. Substitute a known-good passenger's power window switch.
8. Open and close the front passenger's power window by using the front passenger's switch manually.
9. Check for DTCs with the HDS.
Is DTC B1145 indicated? YES
-Faulty front passenger's window motor; replace it.
NO
-Faulty front passenger's power window switch; replace the front passenger's power window switch, 4-door (see page 22-306), 2-door (see page 22-307).
DTC U0155:
Door Multiplex Control Unit Lost Communication With Gauge Control Module
NOTE: If you are troubleshooting multiple DTCs, be sure to follow the instructions in B-CAN System Diagnosis Test Mode A (see page 22-134).
1. Clear the DTCs with the HDS.
2. Turn the ignition switch to LOCK (0) and then back to ON (li).
3. Wait for at least 6 seconds.
4. Check for DTCs with the HDS.
is DTC U0155 indicated? YES
-Go to the gauge control module input test, and do all power, ground and communication input tests (see page 22-347). If the tests prove OK, replace the gauge control module.
NO
-lntermittent failure, the system is OK at this time.
Check for loose or poor connections at the gauge control module and the related u n i t s .
DTC U0164:
Door Multiplex Control Unit Lost Communication With Climate Control Unit
NOTE: If you are troubleshooting rhultiple DTCs, be sure to follow the instructions in B-CAN System Diagnosis Test Mode A (see page 22-134).
1. Clear the DTCs with the HDS.
2. Turn the ignition switch to LpCK (0) and then back to ON (II).
3. Wait for at least 6 seconds.
4. Check for DTCs with the HDS.
is DTC U0164 indicated? YES
-Go to the door multiplex control unit input test and check the power and grounds. If OK, replace the driver's power window master s w i t c h . NO
-lntermittent failure, the system is OK at this time.
Check for loose or poor connections between the door multiplex control unit and climate control unit.
DTC U1282:
Door Multiplex Control Unit Lost Communication With Driver's MICU
NOTE: If you are troubleshooting multiple DTCs, be sure to follow the instructions in B-CAN System Diagnosis Test Mode A (see page 22-134).
1. Clear the DTCs with the HDS.
2. Turn the ignition switch to LOCK (0) and then back to ON (II).
3. Wait for at least 6 seconds.
4. Check for DTCs with the HDS.
Is DTC U1282 indicated? YES
-Go to the driver's MICU input test, and do all power, ground and communication input tests (see page 22-151). If the tests prove OK, replace the driver's under-dash fuse/relay box, USA models (see page 22-86), Canada models (see page 22-87).
NO
-lntermittent failure, the system is OK at this time.
Check for loose or poor connections at driver's under-dash fuse/relay box connector P (20P) and the related units.
DTC U1283:
Door Multiplex Control Unit Lost Communication With Passenger's MICU
NOTE: If you are troubleshooting multiple DTCs, be sure to follow the instructions in B-CAN System Diagnosis Test Mode A (see page 22-134).
1. Clear the DTCs with the HDS.
2. Turn the ignition switch to LOCK (0) and then back to ON (II).
3. Wait for at least 6 seconds.
4. Check for DTCs with the HDS.
Is DTC U1283 indicated? YES
-Go to the passenger's MICU input test, and do all power, ground and communication input tests (see page 22-154). If the tests prove OK, replace the passenger's under-dash fuse/relay box (see page 22-89).
NO
-lntermittent failure, the system is OK at this time.
Check for loose or poor connections at passenger's under-dash fuse/relay box connector A (38P) and the related units.
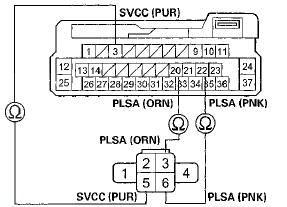
 Circuit Diagram
...
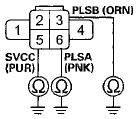
 Power Window Master Switch Input
Test
Power Window Master Switch Input
Test
NOTE: Before testing, troubleshoot the multiplex integrated control unit
first, using B-CAN System Diagnosis Test Mode
A (see page 22-134).
1. Turn the ignition switch to LOCK (0), open and clos ...
See also:
Special Tools
...
Body Specifications
4-door Model:
...
Shifting
Change the shift position in accordance with your driving needs.
• Shift lever positions
You cannot change the power mode from ON to
VEHICLE OFF (LOCK) unless the shift lever is in (P.
The ve ...