 Honda Accord: Driving Position Memory System*
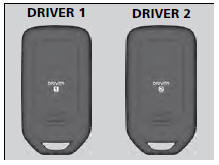
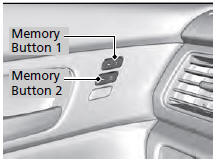
You can store two driver’s seat positions with the driving position memory system.
When you unlock and open the driver’s door with a remote, the seat adjusts automatically to one of the two preset positions.
The multi-information display* shows you which remote you used to unlock the vehicle when you enter.
• DRIVER 1 transmitter is linked to memory button 1.
• DRIVER 2 transmitter is linked to memory button 2.
Using the audio/information screen or multiinformation display, you can disable the automatic seat adjustment function.
• Storing a Position in Memory

1. Set the power mode to ON. Adjust the driver’s seat to the desired position.<.
2. Press the SET button.<.
uYou will hear a beep, and the memory button indicator light will blink.<.
3. Press and hold memory button  or
or
 within five seconds of pressing the SET
button.
within five seconds of pressing the SET
button.
uOnce the seat position has been
memorized, the indicator light on the
button you pressed stays on.
After you press the SET button, the storing operation will be canceled when:
• You do not press the memory button within five
seconds.
• You readjust the seat position before the doublebeep.
• You set the power mode to any position except
ON.
• Recalling the Stored Position

1. Move the shift lever to  .
.

2. Apply the parking brake.
3. Press a memory button (  or
or
 ).
).
uYou will hear a beep, and the indicator
light will blink.
The seat will automatically move to the memorized position. When it has finished moving, you will hear a beep, and the indicator light stays on.
The seat will stop moving if you:
• Press the SET button, or a memory button
( or
or
 ).
).
• Adjust the seat position.
• Shift into any position except
  .
.
• Release the parking brake.
 Rear Defogger/Heated Door Mirror*Button
Press the rear defogger and heated door mirror button to defog the rear
window
and mirrors when the ignition switch is in ON
.
The rear defogger and heated door mirrors
automatically switc ...
 Adjusting the Steering Wheel
The steering wheel height and distance from your body can be adjusted so that
you
can comfortably grip the steering wheel in an appropriate driving posture.
1. Pull the steering wheel adjustmen ...
See also:
Power Distribution
Fuse to Components Index
Under-hood Fuse/Relay Box
* 1 : LX, LX PZEV, LX-P, LX-P PZEV
*2: Except LX, LX PZEV, LX-P, LX-P PZEV
Driver's Under-dash Fuse/Relay Box
Passenger's Under-dash Fus ...
Region Setting
The audio system’s region setting will be lost when the battery is
disconnected or
goes dead.
If the Region Select screen appears, you need to set the region for
the audio
system. Follow th ...
Wiper Blade Replacement
Removal
1. Lift the wiper arms off the windshield.
2. Pull up and hold the tab (A), and slide the wiper blade
assembly (B) toward the tabs until it releases from the
wiper arm (C).
NOTE: The ...