 Honda Accord: Driver's Seat Position Sensor Replacement
Removal (Power seat)
NOTE: Do not t u r n t h e i g n i t i o n s w i t c h t o ON (II), a n d do not connect t h e battery cable w h i l e r e m o v i n g t he d r i v e r ' s seat p o s i t i o n sensor.
1. Raise t h e seat all t he w a y up.
2. Do t h e b a t t e r y terminal disconnection procedure (see page 22-91), t h e n w a i t at least 3 m i n u t e s before s t a r t i ng work.
3. Remove t h e f r o n t d r i v e r ' s seat (see page 20-194).
4. Disconnect t h e d r i v e r ' s seat w i r e harness 2P connector (A) f r om t h e d r i v e r ' s seat p o s i t i o n sensor (B).
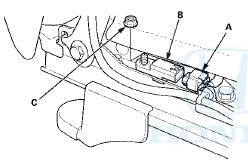
5. Remove t h e nut (C), t h e n remove t h e d r i v e r ' s seat p o s i t i o n sensor.
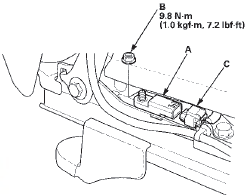
Installation (Power seat)
NOTE: –≤–Ç—û Be s u r e t o install t h e harness so it does not pinched or i n t e r f e re w i t h other parts.
–≤–Ç—û Do not t u r n t h e i g n i t i on s w i t c h t o ON (II), a n d d o not connect t h e battery cable w h i l e i n s t a l l i ng t he d r i v e r 's seat p o s i t i o n sensor.
1. Install t h e d r i v e r ' s seat p o s i t i o n sensor (A) w i t h a nut (B), t h e n connect t h e d r i v e r ' s seat w i r e harness 2P connector (C) t o t h e d r i v e r ' s seat p o s i t i o n sensor.
2. Reinstall t h e f r o n t d r i v e r ' s seat (see page 20-194).
3. Do t h e battery terminal reconnection procedure (see page 22-91).
4. Clear any DTCs w i t h t he HDS (see page 24-38).
5. Check t h e o p e r a t i o n of t he d r i v e r ' s seat p o s i t i on sensor w i t h t h e HDS (see page 24-43).
6. C o n f i rm proper SRS o p e r a t i o n : T u r n t h e i g n i t i on s w i t c h t o ON (II); t h e SRS indicator s h o u l d come on f o r about 6 seconds and t h e n g o off.
Removal (Manual seat)
NOTE: Do not t u r n t h e i g n i t i o n s w i t c h t o ON (II), a n d do not connect t h e battery cable w h i l e r e m o v i n g t he d r i v e r ' s seat p o s i t i o n sensor.
1. Raise t h e seat all t h e w a y up.
2. Do t h e b a t t e r y t e r m i n a l d i s c o n n e c t i o n procedure (see page 22-91), t h e n w a i t at least 3 m i n u t e s before s t a r t i n g work.
3. Remove t h e f r o n t d r i v e r ' s seat (see page 20-194).
4. Remove t h e recline cover (see page 20-208).
5. Disconnect t h e d r i v e r ' s seat p o s i t i o n sensor harness 2P c o n n e c t o r (A) f r o m t h e driver ' s seat position sensor (B).
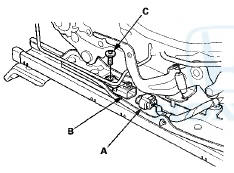
6. Remove t h e TORX b o l t (C) u s i n g a TORX T30 b i t , t h en remove t h e d r i v e r ' s seat p o s i t i o n sensor.
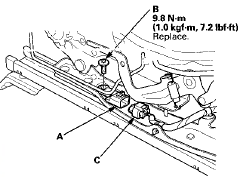
Installation (Manual seat)
NOTE: –≤–Ç—û Be s u r e t o install t h e harness so it does not p i n c h e d or i n t e r f e re w i t h other parts.
–≤–Ç—û Do not t u r n t h e i g n i t i o n s w i t c h t o O N (II), a n d d o not connect t h e battery cable w h i l e i n s t a l l i ng t h e d r i v e r 's seat p o s i t i o n sensor.
1. Install t h e d r i v e r ' s seat p o s i t i o n sensor (A) w i t h a n ew TORX bolt (B), u s i n g a TORX T30 bit. Connect t he d r i v e r ' s seat p o s i t i o n sensor harness 2P connector (C) t o t h e d r i v e r ' s seat p o s i t i o n sensor.
2. Install t h e recline cover (see page 20-208).
3. Install t h e f r o n t d r i v e r ' s seat (see page 20-194).
4. Do t h e battery t e r m i n a l reconnection procedure (see page 22-91).
5. Clear any DTCs w i t h t h e HDS (see page 24-38).
6. Check t h e o p e r a t i o n of t h e d r i v e r ' s seat p o s i t i on sensor w i t h t h e HDS (see page 24-43).
7. C o n f i rm proper SRS o p e r a t i o n : T u r n t h e i g n i t i on s w i t c h t o ON (II); t h e SRS indicator s h o u l d c o m e on f o r about 6 seconds and t h e n go off.
 Front Impact Sensor Replacement
Removal
1. Do t h e battery t e r m i n a l d i s c o n n e c t i o n procedure (see
page 22-91), t h e n w a i t at least 3 m i n u t e s before
s t a r t i ng work.
2. Remove t h e f r o n t b ...
 Passenger's Airbag Cutoff Indicator Replacement
1. With navigation: Remove the dashboard center vent
(see page 20-178).
2. Without navigation: Remove the audio unit (see page
23-114).
3. Disconnect the 6P connector (A) from the passenger's
...
See also:
Preparing to Drive
You should do the following checks
and adjustments before you drive
your vehicle.
1. Make sure all windows, mirrors,
and outside lights are clean and
unobstructed. Remove frost, snow,
or ic ...
Mirror Housing Cover Replacement
1. Remove the mirror holder (see page 20-63).
2. From the mirror holder opening, release the hooks (A)
of the mirror housing cover (B).
3. Release the hooks (A), then remove the mirror
housing ...
Checking Seat Belt Fit
To determine if a lap/shoulder belt
properly fits a child, have the child
put on the seat belt, then ask
yourself:
1. Does the child sit all the way back
against the seat?
2. Do the child‚ ...