 Honda Accord: Driver's Seat Position Sensor Operation Check
Check the driver's seat position sensor after driver's seat position sensor replacement.
1. Make sure the driver's seat is all the way forward position. 2. Make sure the ignition switch is in LOCK (0).
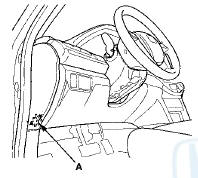
3. Connect the HDS to the data link connector (DLC) (A).
4 . Turn the ignition switch to ON (II).
5. Make sure the HDS communicates with the vehicle and the SRS unit. If it does not communicate, troubleshoot the DLC circuit (see page 11-181).
6. From the HDS Main Menu, select SRS, then PARAMETER INFORMATION. In the PARAMETER INFORMATION Menu, select Buckle Switch, Seat Position Sensor.
7. Using apiece of tape (A), mark the location on the seat's outer cover (B) where the front riser cover meets the seat riser (C). The driver's seat positionsensor should read NEAR.
8. Move the seat back in small increments (about 5mm, 0.2 in) until the driver's seat position sensor reads NOT NEAR. The seat should be about 25 mm (1 in) from the front.
NOTE: It takes a few seconds for the HDS to display changes, so wait for about 5 seconds between each movement.
if the driver's seat position sensor data does not work as described above, check the driver's seat position sensor for damage, and replace parts as needed.
9. Turn the ignition switch to LOCK (0).
10. Disconnect the HDS from the DLC.
 Front Passenger's Weight Sensor Output Check After
a Vehicle Collision
Front Passenger's Weight Sensor Output Check After
a Vehicle Collision
1. Position the front passenger's seat to the rear most
position, and adjust the seat-back to the forward most
position. Do not move the seat from this position.
2. Drive the vehicle, accelerate ...
 DTC Troubleshooting Index
NOTE: The "x" at the end of each DTC denotes a numeric character (0 thru 9),
or items with an asterisk (*) (0, 2 thru 9),
or an alpha character (A thru F) that you will see on the HDS ...
See also:
APP Sensor Signal I n s p e c t i o n
NOTE:
- This procedure checks the APP sensor in its fully
closed position. In any other position, the APP sensor
stores DTCs which are covered in other
troubleshooting procedures.
- Check for P ...
Opening and Closing the Moonroof
• Opening/Closing the Moonroof
You can only operate the moonroof when the ignition switch is in ON
. Use the
switch in the front of the ceiling to open and close the moonroof.
• Automatic o ...
Transmission Number
Transmission Type
88E5: 5-speed Manual
B90A: 5-speed Automatic
Serial Number
3000001-: B90A
8400001-: 88E5 ...