 Honda Accord: Driver's Airbag Replacement
NOTE: If replacing the driver's airbag after deployment, refer to Component Replacement/Inspection After Deployment (see page 24-208) for a complete list of.
other parts that must also be replaced.
Removal
1. Do the battery terminal disconnection procedure (see page 22-91), then wait at least 3 minutes before starting work.
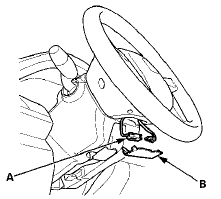
2. Remove the access panel (A) from the steering wheel, then disconnect the driver's airbag 4P connector (B) from the cable reel 4P connector.
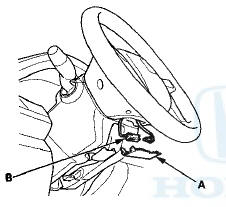
3. Remove the two TORX bolts (A) Using a TORX T30 bit.
4. Remove the driver's airbag (B).
Installation
NOTE: If you are replacing a deployed airbag, inspect the cable reel for heat damage. If there is any damage, replace the cable reel.
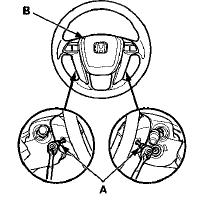
1. Place the driver's airbag (A) in the steering wheel, and secure it with new TORX bolts (B), using a TORX T30 bit.
NOTE: Make sure the clearance (C) between the steering wheel and horn pad is the specified value.
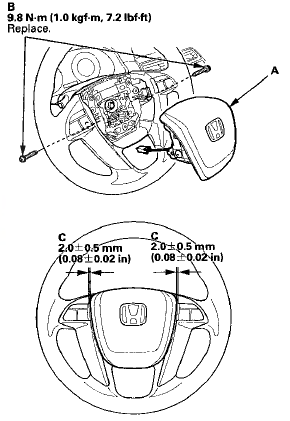
2. Connect t h e d r i v e r ' s airbag 4P connector (A) t o t he cable reel 4P connector, t h e n install t h e access panel (B) on the steering wheel.
3. Do u i o battery t e r m i n a l reconnection procedure (see page 22-91).
4. Clear any DTCs w i t h t h e HDS (see page 24-38).
5. A f t e r i n s t a l l i ng t h e a i r b a g , c o n f i rm proper s y s t em o p e r a t i o n : • Turn t h e i g n i t i o n s w i t c h t o ON (II); t h e SRS indicator s h o u l d c o m e o n f o r about 6 seconds and t h e n go off.
• Make sure t h e h o r n w o r k properly.
 Component Replacement/Inspection After
Deployment
Component Replacement/Inspection After
Deployment
NOTE:
• Before doing any SRS repairs, check the DTCs (see
page 24-36) for the less o b v i o u s deployed
components (seat belt t e n s i o n e r s , front impact
sensors, side airbag sensors ...
 Front Passenger's Airbag Replacement
NOTE: If r e p l a c i n g t h e f r o n t passenger's airbag after
d e p l o y m e n t , refer t o Component Replacement/
Inspection A f t e r Deployment (see page 24-208) f o r a
c o m p l e t e ...
See also:
System Description
The air conditioning (A/C) system removes heat from the passenger compartment
by transferring heat from the ambient
air to the evaporator. The A/C system refrigerant expands in the evaporator, and ...
Fog Light Bulbs*
When replacing, use the following bulbs.
1. Loosen the screw using a Phillips-head
screwdriver.
- Be careful not to rotate the screwdriver
more than one or two times to the left.
...
Cf Under Head Removal
NOTE:
- Use fender covers to avoid damaging painted
surfaces.
- To avoid damage, unplug the wiring connectors
carefully while holding the connector portion.
- Connect the Honda Diagnostic Sys ...