
 Honda Accord: Drive Belt Inspection
1. Inspect the belt for cracks or damage. If the belt is cracked or damaged, replace it (see page 4-30).
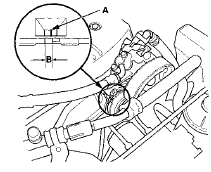
2. Check the position of the auto-tensioner indicator's pointer (A) is within the standard range (B) as shown.
If it is out of the standard range, replace the drive belt (see page 4-30).
 Alternator Control Circuit
Troubleshooting
NOTE: Do this troubleshooting if, in step 5 of the
alternator and regulator circuit troubleshooting (see
page 4-27), the battery voltage is less than 13.5 V.
* 1. Connect the Honda Diagnostic Sys ...
 Drive Belt
Removal/Installation
Special Tools Required
Belt Tension Release Tool Snap-on YA9317 or
equivalent, commercially available
1. Move the auto-tensioner (A) with the belt tension
release tool (B) in the direction of the ...
See also:
Idler Gear/Idler Gear Shaft
Replacement
Special Tools Required
-Driver Handle, 15 x 135L 07749-0010000
-Attachment, 32 x 35 mm 07746-0010100
1. Remove the snap ring from the idler gear/idler shaft
assembly. Do not distort the snap ring. ...
DTC Troubleshooting
DTC P0122: TP Sensor A Circuit Low Voltage
NOTE: Before you troubleshoot, record all freeze data
and any on-board snapshot, and review the general
troubleshooting information (see page 11-3).
1. ...
Valve Body Valve Installation
1. Coat all parts with ATF before assembly.
2. Install the valves and the springs in the sequence
shown for the main valve body (see page 14-277), the
regulator valve body (see page 14-279), and ...