 Honda Accord: Drive Belt Auto-tensioner
Inspection
Honda Accord: Drive Belt Auto-tensioner
Inspection
Special Tools Required
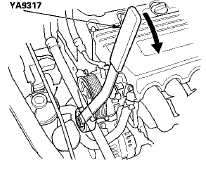
Belt Tension Release Tool Snap-on YA9317 or equivalent, commercially available
1. Turn the ignition switch to ON (II), and make sure to turn the A/C switch OFF. Turn the ignition switch to LOCK (0).
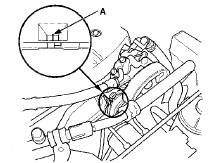
2. Check the position of the auto-tensioner indicator's pointer (A). Start the engine, then check the position again with the engine idling. If the position of the indicator moves or fluctuates very much, replace the auto-tensioner (see page 4-31).
3. Check for abnormal noise from the tensioner pulley. If you hear abnormal noise, replace the auto-tensioner pulley (see page 4-32).
4. Remove the drive belt (see page 4-30).
5. Move the auto-tensioner within its limit with the belt tension release tool in the direction of the rotation arrow. Check that the auto-tensioner moves smoothly and without any abnormal noise. If the auto-tensioner does not move smoothly, or if you hear abnormal noise, replace the auto-tensioner (see page 4-31).
6. Remove the auto-tensioner (see page 4-31).
7. Clamp the auto-tensioner (A) by using two 8 mm bolts (B) and a vise (C) as shown. Do not clamp the auto-tensioner itself.
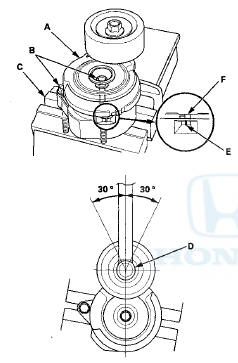
8. Attach the torque wrench (D) on the pulley bolt, and align it as shown.
9. Align the auto-tensioner indicator's pointer (E) on the auto-tensioner base with Max. belt position mark (F) on the auto-tensioner arm by using the torque wrench, and measure the torque. If the torque value is out of specification, replace the auto-tensioner (see page 4-31).
NOTE: If the auto-tensioner indicator's pointer exceeds the Max. belt position mark, recheck the torque.
Auto-tensioner Spring Torque: 33.1 - 4 0 . 5 N-m (3.38-4.13 kgf-m, 24.4-29.9 Ibfft)
 Drive Belt
Removal/Installation
Drive Belt
Removal/Installation
Special Tools Required
Belt Tension Release Tool Snap-on YA9317 or
equivalent, commercially available
1. Move the auto-tensioner (A) with the belt tension
release tool (B) in the direction of the ...
 Drive Belt Auto-tensioner
Removal/Installation
Drive Belt Auto-tensioner
Removal/Installation
1. Remove the drive belt (see page 4-30).
2. Remove the power steering (P/S) fluid reservoir from
the holder.
3. Remove the P/S pump (A) without disconnecting the
P/S hoses, then remove the P/ ...
See also:
Beverage Holders
Be careful when you are using the
beverage holders. A spilled liquid
that is very hot can scald you or your
passengers. Spilled liquids can
damage the upholstery, carpeting,
and electrical c ...
Cylinder Head Cover Installation
1. Thoroughly clean the head cover gasket and the
groove.
2. Install the head cover gasket (A) in the groove of the
cylinder head cover (B).
3. Check that the mating surfaces are clean and dry ...
Tire Pressure Monitoring System (TPMS) -Required Federal Explanation
Each tire, including the spare (if provided), should be checked monthly when
cold and inflated to the inflation pressure recommended by the vehicle
manufacturer on the vehicle placard or tire infl ...