 Honda Accord: Door Lock Actuator Test
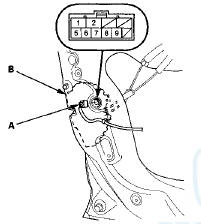
Driver's Door and Left Rear Door (4-door)
1 Remove the door panel.
• Front (see page 20-17)
• Rear (see page 20-38)
2. Disconnect the 10P connector (A) from the actuator (B).
NOTE: The illustration shows the driver's door.
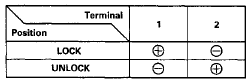
3. Check the actuator operation by connecting power and ground according to the table. To prevent damage to the actuator, apply battery voltage only momentarily.
4. If the actuator does not operate as specified, replace it.
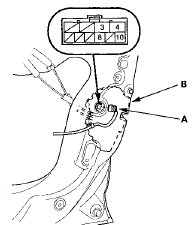
Front Passenger's Door and Right Rear Door (4-door)
1. Remove the door panel.
• Front (see page 20-17) • Rear (see page 20-38)
2. Disconnect the 10P connector (A) from the actuator (B).
NOTE: The illustration shows the front passenger's door.
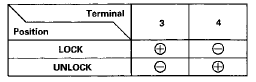
3. Check the actuator operation by connecting power and ground according to the table. To prevent damage to the actuator, apply battery voltage only momentarily.
4. If the actuator does not operate as specified, replace it.
 Control Unit Input Test
NOTE: Before testing, troubleshoot the multiplex integrated control unit
first, using B-CAN System Diagnosis Test Mode
A (see page 22-134), and make sure the lighting system works properly.
Driver ...
 Door Lock Knob Switch Test
Driver's Door
1. Remove the driver's door panel (see page 20-17).
2. Disconnect the 10P connector (A) from the door lock
actuator (B).
3. Check for continuity between the terminals.
• ...
See also:
Voice Control Operation
Your vehicle has a voice control system that allows hands-free operation of
most of
the navigation system functions.
The voice control system uses the
(Talk) and (hang-up/back) buttons
on ...
Rear Defogger/Heated Door Mirror*Button
Press the rear defogger and heated door mirror button to defog the rear
window
and mirrors when the ignition switch is in ON
.
The rear defogger and heated door mirrors
automatically switc ...