 Honda Accord: Damper/Spring Removal and Installation
Removal
1. Raise and support the vehicle (see page 1-13).
2. Remove the rear wheel.
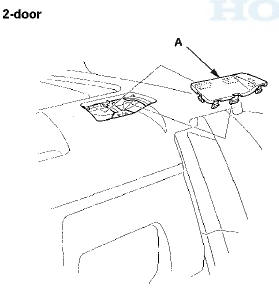
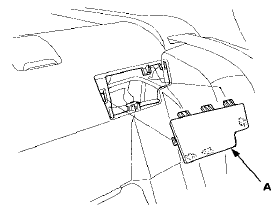
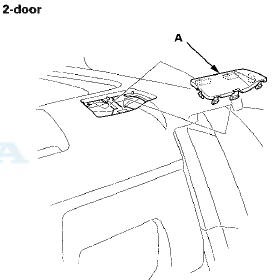
3. Fold down the rear seat-back, then remove the lid (A).
NOTE: For 4-door, lift up the tab (B) inside underneath the lid first using a flat-tipped screwdriver, then release the hooks.
4-door
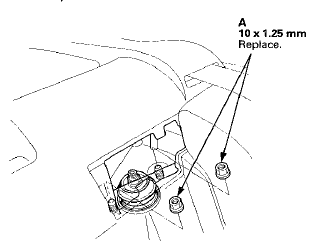
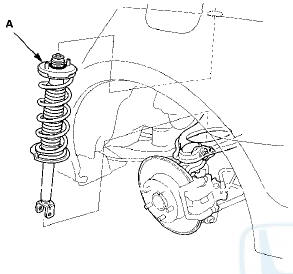
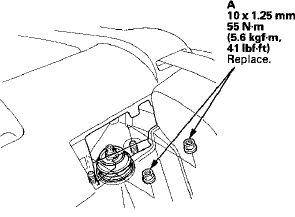
4. Remove the damper mounting nuts (A) from the top of the damper.
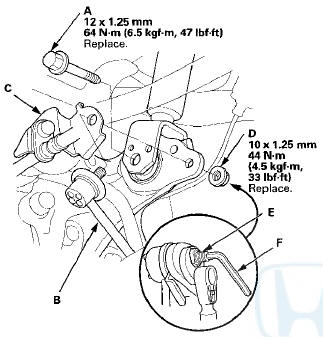
5. Remove the flange nut (A) while holding the joint pin (B) with a hex wrench (C), then disconnect the stabilizer link (D) from the knuckle, and remove the brake hose bracket (E).
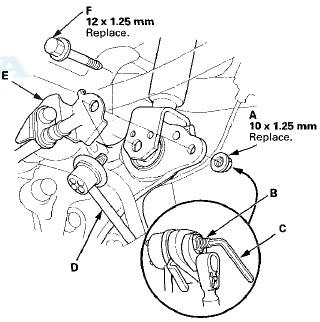
6. Remove the damper lower mounting bolt (F).
7. Remove the damper/spring (A) by lowering the rear suspension.
NOTE: Be careful not to damage the body.
Installation
1. Lower the rear suspension, and position the damper/spring (A) in the body with the welded nut (B) on the bottom of the damper facing forward.
NOTE: - Be careful not to damage the body.
- Make sure the damper is installed in the correct direction.
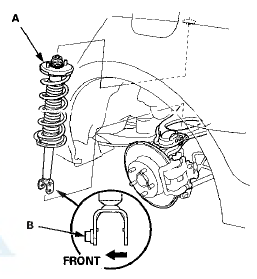
2. Loosely install the new damper mounting nuts (A) to the top of the damper.
3. Loosely install the new damper lower mounting bolt (A) on the bottom of the damper. Connect the stabilizer link (B) to the brake hose bracket (C) to the knuckle, and loosely install the new flange nut (D).
4. Place a floor jack under the connecting point of the knuckle and lower arm A, and raise the suspension to load with the vehicle's weight.
5. Tighten the damper lower mounting bolt and the flange nut while holding the joint pin (E) with the hex wrench (F) to the specified torque.
6. Tighten the damper mounting nuts on top of the damper to the specified torque.
7. Install the lid (A), and set the rear seat-back to the original position.
4 door
8. Clean the mating surfaces of the brake disc and the inside of the wheel, then install the rear wheel.
9. Check the wheel alignment, and adjust it if necessary (see page 18-5).
 Stabilizer Bar Replacement
1. Raise and support the vehicle (see page 1-13).
2. Remove the rear wheels.
3. Disconnect both stabilizer links from the stabilizer bar
(see page 18-47).
4. Remove the flange bolts (A) and ...
 Damper/Spring Disassembly, Inspection, and
Reassembly
Damper/Spring Disassembly, Inspection, and
Reassembly
Exploded View
NOTE: When compressing the damper spring, use a
commercially available strut spring compressor (Branick
MST-580A or Model 7200, or equivalent) according to
the manufacturer's instr ...
See also:
XM Radio Display Messages
‘‘LOADING’’ - XM is loading the
audio or program information.
‘‘OFF AIR’’ - The channel currently selected is no
longer
broadcasting.
‘‘UPDATING’’ - The encryption code ...
Oil Pump Chain Replacement
NOTE: Keep the oil pump chain away from magnetic
fields.
Removal
1. Remove the drive belt (see page 4-30).
2. Remove the oil pan (see page 7-11).
3. Support the engine with a jack and a wood ...
Circuit Diagram
'08-09 Models With Navigation
'10 Model With Navigation
'08-09 Models Without Navigation
'10 Model Without Navigation
...