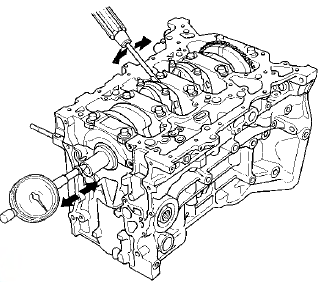
 Honda Accord: Connecting Rod and Crankshaft End Play Inspection
1. Remove the oil pump (see page 8-16).
2. Remove the baffle plate (see step 8 on page 7-14).
3. Measure the connecting rod end play with a feeler gauge between the connecting rod and the crankshaft.
Connecting Rod End Play
Standard (New): 0.15-0.35 mm (0.006-0.014 in)
Service Limit: 0.40 mm (0.016 in)

4. If the connecting rod end play is beyond the service limit, install a new connecting rod, and recheck. If it is still beyond the service limit replace the crankshaft (see page 7-14).
5. Push the crankshaft firmly away from the dial indicator, and zero the dial against the end of the crankshaft. Then pull the crankshaft firmly back toward the indicator; the dial reading should not exceed the service limit.
Crankshaft End Play
Standard (New): 0.10-0.35 mm (0.004- 0.014 in)
Service Limit: 0.45 mm (0.018 in)

6. If the end play is beyond the service limit, replace the thrust washers and recheck, if it is still beyond the service limit, replace the crankshaft (see page 7-14).
 Crankshaft Main Bearing Replacement
Main Bearing Clearance Inspection
1. To check the main bearing-to-journal oil clearance,
remove the lower block and the bearing halves (see
page 7-14).
2. Clean each main journal and the bearing ...
See also:
Center Console Panel
Removal / Installation
Special Tools Required
KTC Trim Tool Set SOJATP2014*
*Available through the Honda Tool and
Equipment
Program; call 888-424-6857
NOTE;
- Put on gloves to protect your hands.
- Take care not t ...
Back-up Light Switch Test
1. Disconnect the back-up light switch 2P connector (A).
2. Check for continuity between back-up light switch 2P
connector terminals No. 1 and No. 2. There should be
continuity only when the shif ...
Front Seat Active Head Restraint
Inspection
NOTE: If the vehicle has been in a collision, always
inspect the active head restraint, even if they appear
reusable, by doing the following procedure.
1. Driver's seat (manual height adjustable ...

