 Honda Accord: Component Replacement/Inspection After
Deployment
Honda Accord: Component Replacement/Inspection After
Deployment
NOTE: • Before doing any SRS repairs, check the DTCs (see page 24-36) for the less o b v i o u s deployed components (seat belt t e n s i o n e r s , front impact sensors, side airbag sensors, etc.) • Do not replace the ODS unit unless it is p h y s i c a l ly damaged or a s p e c i f i c fault was found d u r i n g DTC t r o u b l e s h o o t i n g .
• After a v e h i c l e c o l l i s i o n , do the ODS unit o p e r a t i on check (see page 24-41).
• After a v e h i c l e c o l l i s i o n , inspect the front seat active head restraints (see page 20-193).
After a c o l l i s i o n where the seat belt t e n s i o n e r s d e p l o y e d, replace these items:
• SRS unit
• Seat belt tensioners
• Front i m p a c t sensors
After a c o l l i s i o n w h e r e t h e f r o n t airbag(s) deployed, replace these items:
•SRS unit
• Deployed airbag(s)
• Seat belt tensioners
• Front impact sensors
After a c o l l i s i o n w h e r e t h e s i de airbag(s) d e p l o y e d, replace these items:
• SRS unit
• Side impact sensor(s) (first)
• Side impact sensor(s) (second)
• Front seat assembly (Impact side)
After a c o l l i s i o n w h e r e a s i de c u r t a i n airbag has d e p l o y e d , replace t h e i t e m s f o r t h e side(s) t h a t d e p l o y e d:
• SRS unit
• Deployed side c u r t a i n airbag(s)
• Seat belt tensioner(s)
• Side impact sensor(s) (first)
• Side impact sensor(s) (second)
• Rear s a f i n g sensor
• Roof t r im
• A-pillar trim
• B-pillar upper t r im (4-door)
• C-pillar rim
• Front grab handle
• Rear grab handle (4-door)
• All related t rim clips
• Sunvisor
After a m o d e r a t e t o severe side o r rear c o l l i s i o n , inspect f o r any d a m a g e o n t h e s i de c u r t a i n a i r b a g o r o t h er related components. Replace t h e c o m p o n e n t s as needed.
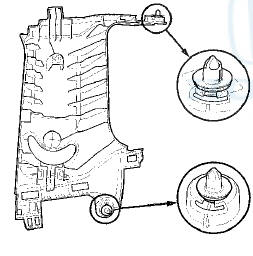
4-Door A-Pillar Trim

2-Door model is same as shown.
B-Pillar Trim
C-Pillar T r im

2-Door B-Pillar Upper Trim
C-Pillar Trim

During t h e repair process, inspect these areas: • Inspect all t h e SRS w i r e harnesses. Replace, d o not repair, a n y d a m a g e d harnesses.
• Inspect t h e cable reel f o r heat damage. If t h e re is a ny damage, replace t h e cable reel.
After t h e v e h i c l e is c o m p l e t e l y repaired, t u r n t h e i g n i t i on s w i t c h t o O N (II). If t h e SRS i n d i c a t o r comes o n f o r about 6 seconds a n d t h e n goes off, t h e SRS is OK. If t he indicator does not f u n c t i o n properly, use t he HDS to read t h e DTC (see page 24-37). If y o u cannot retrieve a code, d o t h e SRS S y m p t o m Troubleshooting.
Checking and Adjusting the Headliner/Pillar Trim Overlap
To prevent t h e s i de curtain airbag from deploying and damaging t h e pillar trim, the overlap between the headliner and p i l l a r t r im must be less t h e n 8 m m (0.3 i n ).
To check t he o v e r l a p , d o t h i s: 1. Install t h e headliner (A) a n d t h e p i l l a r t r im (B).

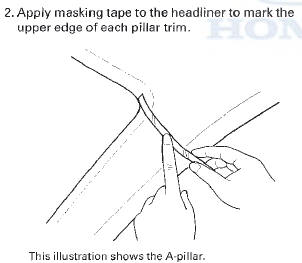
3. Remove t h e p i l l a r t r i m , a n d measure t h e headliner overlap.
• If t h e o v e r l a p is less t h a n 8 m m (0.3 i n ) , r e m o v e t he tape, a n d install t h e pillar t r i m.
• I f t h e o v e r l a p is m o r e t h a n 8 m m (0.3 i n ) , g o t o step 4.
This illustration shows the A-pillar.
4. Carefully t r im t h e headliner w i t h a u t i l i t y knife, r e d u c i n g t h e o v e r l a p t o less t h a n 8 m m (0.3 in).

This illustration shows the A-pillar.
5. Remove t h e t a p e , a n d install t h e p i l l a r t r i m.
 Symptom Troubleshooting
SRS indicator does not come on
NOTE: 2-door: Before replacing t h e SRS u n i t , check the
SRS u n i t software v e r s i o n w i t h t h e HDS. I f t h e software
v e r s i o n is not t h e lates ...
 Driver's Airbag Replacement
NOTE: If replacing the driver's airbag after deployment,
refer to Component Replacement/Inspection After
Deployment (see page 24-208) for a complete list of.
other parts that must also be replace ...
See also:
Electrical Compass Zone Selection
and Calibration
NOTE:
• You should do this procedure any time the electrical
compass unit is replaced.
• You should do this procedure in an open area away
from buildings, power lines, and other vehicl ...
USB Flash Memory Device Error Messages (Models with navigation system)
If you see an error message in the
center display while playing a USB
flash memory device, find the
solution in the chart to the right. If
you cannot clear the error message,
take your vehic ...
Outside Air Temperature Sensor
Replacement
1 Disconnect the 2P connector (A) from the outside air
temperature sensor (B).
2. Lift the tab (C) to release the lock, then remove the
outside air temperature sensor from the front
bumper.
3 ...