 Honda Accord: Ceiling Light Test/Replacement
1. Turn the celling light switch OFF.
2. Carefully pry the lens (A) off with a small screwdriver.
2. Carefully pry the lens (A) off with a small screwdriver.
Celling Light 8 W
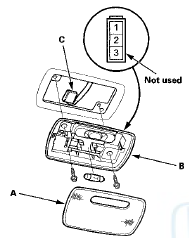
3. Remove the screws, then remove the ceiling light (B).
4. Disconnect the 3P connector (C) from the ceiling light.
5. Check for continuity between the terminals.
• There should be continuity between terminals No. 1 and No. 2 with the switch in the MIDDLE position.
• There should be continuity between terminals No. 2 and No. 3 (body ground) with the switch in the ON position.
• There should be no continuity between terminals No. 1 and No. 2, and between terminals No. 2 and No. 3 (body ground) with the switch in the OFF position.
6. If the continuity is not as specified, check the bulb. If the bulb is OK, replace the ceiling light.
7. Install the light in the reverse order of removal.
 Front Individual Map Light
Test/Replacement
Front Individual Map Light
Test/Replacement
With moonroof
1. Turn the map light switch OFF.
2. Carefully pry the lens ( A ) off with a small screwdriver.
Individual Map Light: 8 W x 2
3 . Remove the screws, then remove the individual ma ...
 Trunk Light Test/Replacement
1. Open the trunk lid.
2. Carefully pry out the trunk light (A).
Trunk Light: 5 W
3. Disconnect the 2P connector (B) from the trunk light.
4. Check for continuity between terminals No. 1 ( + ...
See also:
Cf Under Head Removal
NOTE:
- Use fender covers to avoid damaging painted
surfaces.
- To avoid damage, unplug the wiring connectors
carefully while holding the connector portion.
- Connect the Honda Diagnostic Sys ...
Brake/Clutch Fluid
Use the same fluid for both the brakes and clutch.
• Checking the Brake Fluid
The fluid level should be between the MIN
and MAX marks on the side of the reservoir.
NOTICE
Brake fluid marke ...