 Honda Accord: Cam Chain Auto-tensioner Removal
and installation
Honda Accord: Cam Chain Auto-tensioner Removal
and installation
Removal
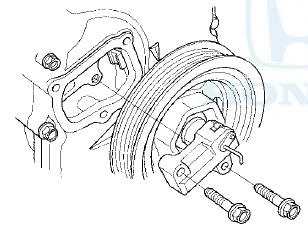
1.Remove the chain case cover
2. Turn the crankshaft counterclockwise to compress the auto-tensioner.
3. Align the holes on the lock (A) and the auto-tensioner (B), then insert a 1.2 mm (0.05 in) diameter pin or lock pin (P/N 14511-PNA-003) (C) into the holes. Turn the crankshaft clockwise to secure the pin.
4. Remove the auto-tensioner.
Installation
1. Install the auto-tensioner.
NOTE: Check the auto-tensioner cam position. If the position are not aligned, set the first cam to the first edge of the rack (see step 9 on page 6-66).

2. Remove the 1.2 mm (0.05 in) diameter pin or lock pin (P/N 14511-PNA- 003) from the auto-tensioner.
3. Remove the old liquid gasket from the chain case cover mating surfaces, the bolts, and the bolt holes.
4. Clean and dry the chain case cover mating surfaces.
5. Apply liquid gasket, P/N 08717-0004,08718-0003, or 08718-0009 to the chain case mating surface of the chain case cover, and to the inside edge of the threaded bolt holes. Install the component within 5 minutes of applying the liquid gasket.
NOTE: - Apply a 3 mm (0.12 in) diameter bead of liquid gasket along the broken line (A).
- If too much time has passed after applying the liquid gasket, remove the old liquid gasket and residue, then reapply new liquid gasket.

6. Install the chain case cover.
NOTE: - Wait at least 30 minutes before filling the engine with oil.
- Do not run the engine for at least 3 hours after installing the chain case cover.
 Cam Chain Installation
Special Tools Required
Camshaft Lock Pin Set 07AAB-RWCA120
NOTE:
- Keep the cam chain away from magnetic fields.
- Before doing this procedure, check that the variable
valve timing control (VTC ...
 Cam Chain Case Oil Seal
Installatio
Cam Chain Case Oil Seal
Installatio
Special Tools Required
Driver Handle, 15 x 135L 07749-0010000
Attachment, 52 x 55 mm 07746-0010400
1. Clean and dry the crankshaft oil seal.
2. Apply a light coat of new engine oil to the lip of ...
See also:
Climate Control Switch
Communication Line Circuit
Troubleshooting
1. Operate the climate control system with the
passenger's climate control switch in all modes.
Does the climate control system operate?
YES-lntermittent failure. Check for loose wires or
poor c ...
Oil Pump Overhaul
Exploded View
Oil Pump Removal
1. Turn the crankshaft pulley so its top dead center (TDC)
mark (A) lines up with the pointer (B).
NOTE: The other pointer (C) is not used.
2. Remove the oil ...
Electrical Compass Zone Selection
and Calibration
NOTE:
• You should do this procedure any time the electrical
compass unit is replaced.
• You should do this procedure in an open area away
from buildings, power lines, and other vehicl ...