 Honda Accord: Bulb Replacement
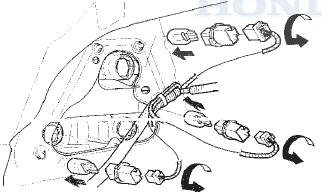
Headlight (High'Beam)
1. Disconnect the 2P connector (A) from the headlight
Headlight (High Beam): 60 W
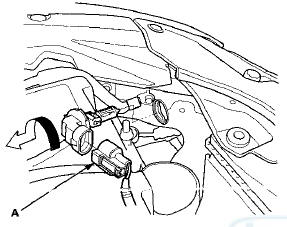
2. Turn the bulb socket 45 В° counterclockwise to remove the bulb.
3. Install a new bulb in the reverse order of removal.
Headlight (Low Beam)
1. Remove the inner fender (see page 20-290).
2. Disconnect the 2P connector (A) from the headlight.
Headlight (Low Beam):
51 W (4-door)
55 W (2-door)
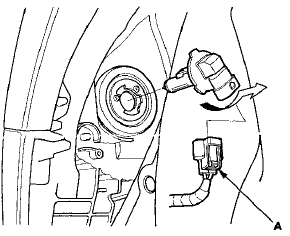
3. Turn the bulb socket 45 В° counterclockwise to remove the bulb.
4. Install a new bulb in the reverse order of removal.
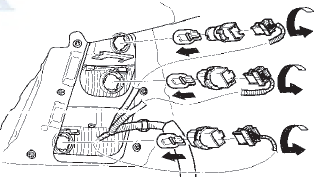
Front Turn Signal/Parking Lights
1. Disconnect the 3P connector (A) from the front turn signal/parking lights.
Front Turn Signal/Parking Lights:
21/5 W (4-door)
24/2.2 CP (2-door)
NOTE: The illustration shows 4-door.
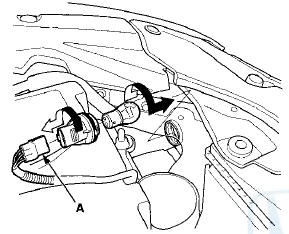
2. Turn the bulb socket 45 В° counterclockwise to remove the bulb.
3. Install a new bulb in the reverse order of removal.
Front Side Marker Light
1. Remove the inner fender (see page 20-290).
2. Disconnect the 2P connector (A) from the front side marker light.
Front Side Marker Light: 3 CP
NOTE: The illustration shows 4-door.
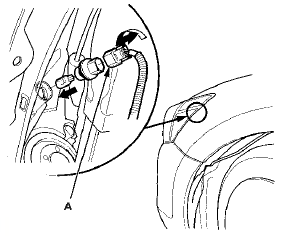
3. Turn the bulb socket 45 В° counterclockwise to remove the bulb.
4. Install a new bulb in the reverse order of removal.
Taillights (4-door)
1. Open the trunk lid, and remove the trunk side trim panel (see page 20-132).
2. Disconnect the connectors from the lights.
Brake Lights/TaiIIights:21/5 W
Rear Turn Signal Light; 21 W
Back-up light: 21 W
3. Turn the bulb socket 45 В° counterclockwise to remove the bulb.
4. Install new bulb(s) in the reverse order of removal.
Taillights (2-door)
1. Open the trunk lid, and remove the trunk side trim panel (see page 20-132).
2. Disconnect the connectors from the lights.
Brake Lights/Taillights:21/5 W
Rear Turn Signal Light: 21 W
Back-up Light: 21 W
3. Turn the bulb socket 45 В° counterclockwise to remove the bulb.
4. Install new bulb(s) in the reverse order of removal.
 Headlight Replacement
4-door
1. Remove the parts shown.
• Upper fender trim (see page 20-277)
• Front bumper (see page 20-255)
• Front bumper absorber (see page 20-255)
2. Remove the three bolts, and ...
 Taillight Replacement
4-door
1 Remove the rear bumper (see page 20-260).
2. Remove the trunk side trim panel (see page 20-132).
3. Disconnect the connectors (A) from the taillights (B).
4 . Turn the bulb sockets ...
See also:
Mode Control Motor Test
NOTE: Before testing the motor, check for HVAC DTCs
(see page 21-101).
1. Disconnect the 7P connector from the mode control
motor.
Incorrectly applying power and ground to the mode
control mo ...
Loading Discs in the Changer
To load multiple discs in one
operation:
1. With the ignition in the
ACCESSORY (I) or the ON (II)
position, press and hold the LOAD
button until you hear a beep and
see ‘‘LOAD’’ in ...
Your Vehicle at a Glance
Your Vehicle at a Glance
Your Vehicle at a Glance ...