 Honda Accord: Brake System Bleeding
NOTE: - Do not reuse the drained fluid. Use only new Honda DOT 3 Brake Fluid from an unopened container. Using a non-Honda brake fluid can cause corrosion and shorten the life of the system.
- Make sure no dirt or other foreign matter gets in the brake fluid.
- Do not spill brake fluid on the vehicle; it may damage the paint. If brake fluid does contact the paint, wash it off immediately with water.
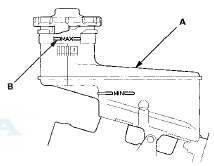
- The reservoir connected to the master cylinder must be at the MAX (upper) level mark at the start of the bleeding procedure and checked after bleeding each wheel location. Add fluid as required.
1. Make sure the brake fluid level in the reservoir (A) is at the MAX (upper) level line (B).
2. Have someone slowly pump the brake pedal several times, then apply steady pressure.
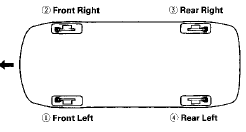
3. Start the bleeding at the driver's side of the front brake system.
NOTE: Bleed the calipers in the sequence shown.
BLEEDING SEQUENCE
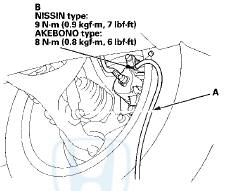
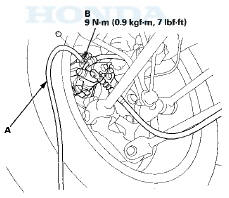
4. Attach a length of clear drain tube (A) to the bleed screw (B), then loosen the bleed screw to allow air to escape from the system. Then tighten the bleed screw securely.
NOTE: The illustrations show the NISSIN type.
Front
Rear
5. Refill the master cylinder reservoir to the MAX (upper) level line.
6. Repeat the procedure for each brake circuit until there are no air bubbles in the fluid.
 Parking Brake Inspection and Adjustment
Inspection
1. Pull the parking brake lever (A) with 196 N
(20 kgf, 44 Ibf) of force to fully apply the parking brake.
The parking brake lever should be locked within the
specified number of clic ...

See also:
Hood insulator Replacement
For Some Models
NOTE; Take care not to scratch the hood.
1. Detach the clips with a clip remover. Remove the
hood insulator (A) by pulling it away from the hooks
(B).
2. Install the ins ...
Vehicle Storage
If you need to park your vehicle for
an extended period (more than 1
month), there are several things you
should do to prepare it for storage.
Proper preparation helps prevent
deterioration a ...
Gross VehicleWeight Rating (GVWR):
The maximum allowable weight of
the vehicle, all occupants, all
accessories, all cargo, and the
tongue load is:
U.S. models
LX:
4,299 lbs (1,950 kg)
EX and EX-L:
4,409 lbs (2,000 kg)
V6 mo ...