 Honda Accord: Bearing Installation
Special Tools Required
-Attachment, 78 x 80 mm 07NAD-PX40100
-Driver Handle, 15 x 135L 07749-0010000
-Bearing Driver Attachment, 42 x 47 07746-0010300
1. Install the bearings in the direction shown.
2. Expand each snap ring using snap ring pliers, and install the mainshaft bearing (A) and the countershaft bearing (B) part-way into the housing using the driver handle and the 78 x 80 mm attachment.
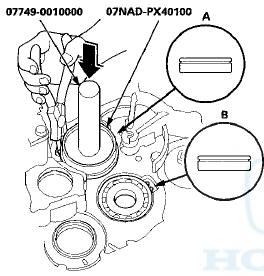
3. Release the snap ring pliers, then push the bearing down into the transmission housing until the snap ring snaps in place around it.
4. Expand the snap ring of the secondary shaft bearing (A) and handle the idler gear shaft bearing (B) using the snap ring pliers, and install the bearing part-way into the housing using the driver handle and the 42 x 47 mm bearing driver attachment.

5. Release the snap ring pliers, then push the bearings down into the transmission housing until the snap ring snaps in place around it.
6. After installing the bearings check that the snap rings (A) are seated in the bearing and the transmission housing grooves, and that the snap ring end gaps (B).
are correct.
7. Install the idler gear shaft (see page 14-297).
 Bearing Removal
Special Tools Required
•Attachment, 78x80 mm 07NAD-PX40100
-Driver Handle, 15 x 135L 07749-0010000
-Bearing Driver Attachment, 42 x 47 07746-0010300
1. Remove the idler gear shaft (see page 1 ...
 Reverse Idler Gear Removal and
Installation
Reverse Idler Gear Removal and
Installation
Removal
1. Remove the bolt (A) securing the reverse idler gear
shaft holder (B).
2. Install a 5 x 0.8 mm bolt (C) in the reverse idler gear
shaft (D), and pull it to remove the reverse idler gea ...
See also:
System Description
Overview
The audio unit acts as the processor for all audio functions. You can select
the audio functions from the front panel, the
audio remote (on the steering wheel), or by using the navigation ...
Circuit Diagram
...
To Stop Playing a Disc
Press the eject button ( ) to
remove the disc. If you eject the disc,
but do not remove it from the slot,
the system will automatically reload
the disc after 10 seconds and begin
playing.
...