 Honda Accord: Back-up Light Switch Test
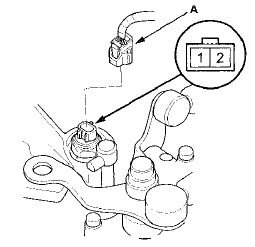
1. Disconnect the back-up light switch 2P connector (A).
2. Check for continuity between back-up light switch 2P connector terminals No. 1 and No. 2. There should be continuity only when the shift lever is in reverse.
- If there is continuity, go to step 5.
- If there is no continuity, go to step 3.
BACK-UP LIGHT SWITCH 2P CONNECTOR
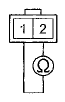
Terminal side of male terminals
3. Remove the back-up light switch (A). Check for continuity between back-up light switch 2P connector terminals No. 1 and No. 2. There should be continuity when the switch end (B) is pressed, and no continuity when the switch end is released.
- If there is continuity, check the reverse shift mechanism in the transmission.
- If there is no continuity, replace the back-up light switch.
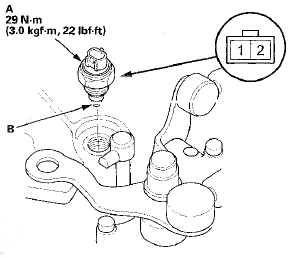
BACK-UP LIGHT SWITCH 2P CONNECTOR
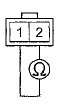
Terminal side of male terminals
4. Apply liquid gasket (P/N 08717-0004, 08718-0001, 08718-0012,08718-0003, or 08718-0009) to the threads of the back-up light switch, and install it on the transmission housing.
5. Connect the back-up light switch 2P connector.
 Transmission Fluid Inspection and Replacement
1. Raise the vehicle on a lift, and make sure it is securely
supported.
2. Remove the front splash shield (see page 20-291).
3. Remove the oil filler plug (A) and the sealing washer
(B), check ...
 Transmission Removal
Special Tools Required
- Engine Support Hanger, A and Reds
AAR-T1256*
- Engine Hanger Adapter VSB02C000015*
- Subframe Adapter VSB02C000016*
*: Are available through the Honda Tool and Equipme ...
See also:
Output Shaft (Countershaft) Speed
Sensor Replacement
NOTE: For A/T models (see page 14-188).
M/T
1. Disconnect the output shaft (countershaft) speed
sensor 3P connector (A).
2. Remove the output shaft (countershaft) speed sensor
(B).
3. Instal ...
Countershaft Reassembly
Exploded View
*: The components of the triple cone synchro assembly.
Special Tools Required
-СћDriver Handle, 40 mm I.D. 07746-0030100
- Bearing Driver Attachment, 30 mm 07746-0030300
NOTE: R ...
Rear Seat Cushion Cover
Replacement
NOTE:
-Put on gloves to protect your hands.
- Take care not to tear or damage the seat covers.
1. Remove the seat cushion (see page 20-241).
2. From the back of the seat-back, release all th ...