 Honda Accord: Audio with Touch Screen
Use the touch screen to operate the audio system.
• Selecting an Audio Source
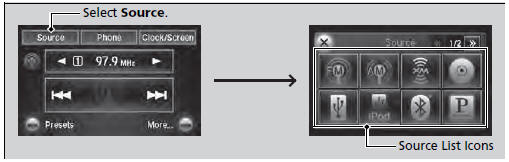
Select Source, then select an icon on the source list to switch the audio source.
• Displaying the Menu Items
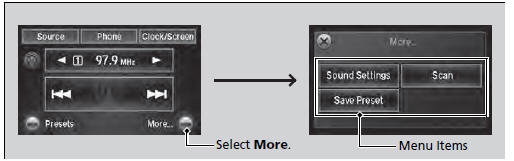
Select More to display the menu items.
Icons that appear on the screen vary by the source selected.
Select  to go back to the previous
screen.
to go back to the previous
screen.
Use the  icons to turn the page.
• Changing the Clock/Screen Settings
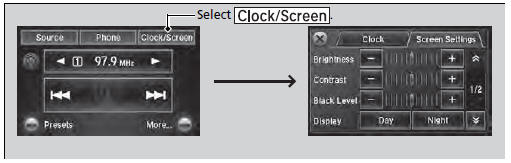
Select  to adjust the clock and
screen settings.
to adjust the clock and
screen settings.
• Changing the Screen settings
1. Select Screen Settings.
2. Use  or others to adjust the
setting.
or others to adjust the
setting.
The followings are adjustable screen settings:
• Brightness
• Contrast
• Black Level
• Display
Changes between the daytime or nighttime
modes.
• Beep
Mutes a beep that sounds every time you touch the
screen.
• Keyboard
Changes the on-screen keyboard from the
alphabetical order to the qwerty type.
• Blackout
Sets the screen black out timing.
Adjusting the Sound

1. Select More, then Sound Settings.
2. Use  or others to adjust the
setting.
or others to adjust the
setting.
Select Off, Low, Mid or High for the SVC setting.
• Displaying the Phone Operation Screen
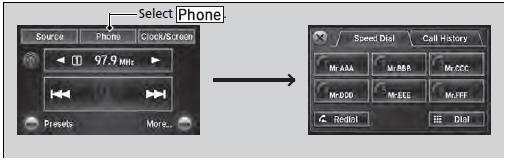
Select  to switch to the phone
operation screen.
to switch to the phone
operation screen.
The phone operation screen is available when a phone is paired to HFL.
 Audio System Basic Operation
To use the audio system function, the power mode must be in ACCESSORY or ON.
Use the selector knob, DISP and BACK
buttons to access some audio functions.
Press to switch between the
normal ...
 Audio/Information Screen
Displays the audio status and wallpaper. From this screen, you can go to
various
setup options.
• Switching the Display
Press the DISP button to go to the Function Change screen.
Ro ...
See also:
Center Console Rear Trim
Removal/Installation
Special Tools Required
KTC Trim Tool Set SOJATP2014*
*Available through the Honda Tool and
Equipment
Program; call 888-424-6857
NOTE:
- Take care not to scratch the center console and the
rela ...
Headlight Replacement
4-door
1. Remove the parts shown.
• Upper fender trim (see page 20-277)
• Front bumper (see page 20-255)
• Front bumper absorber (see page 20-255)
2. Remove the three bolts, and ...
Circuit Diagram
DRIVER'S UNDER-DASH
FUSE/RELAY BOX CONNECTOR N (16P)
Wire side of female terminals
DRIVER'S UNDER-DASH
FUSE/RELAY BOX CONNECTOR P (20P)
Wire side of female terminals
GAUGE CONTROL MODULE 3 ...