 Honda Accord: Audio Switch Panel
Removal/Installation
Honda Accord: Audio Switch Panel
Removal/Installation
With Navigation
NOTE: • Put on gloves to protect your hands.
• Take care not to scratch the dashboard and related parts.
• Lay a workshop towel under the parts when working on them to protect the face panel from scratches or other damage.
• Do not work in a dusty or dirty place.
• Discharge static electricity from your body before and during the work.
• Do not touch the circuit board with your bare hands.
• Do not work with dirty hands.
• Be careful not no fold the flat plate cable.
• Do not touch the terminal connector of the flat plate cable with your bare hands. (If you have touched it, wipe it off thoroughly.) 1. Remove the audio unit (see page 23-114).
2. Remove the interface dial (see page 23-239).
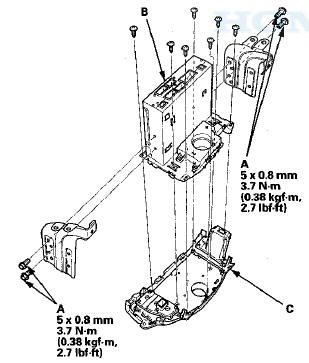
3. Remove the mounting screws and bolts (A) from the audio unit (B), then remove the audio unit'from the audio switch panel (C).
4. Install the audio switch panel in the reverse order of removal.
Without Navigation
NOTE: • Put on gloves to protect your hands.
• Take care not to scratch the dashboard and related parts.
• Lay a shop towel under the parts when working on them to protect the face panel from scratches or other damage.
• Do not work in a dusty or dirty place.
• Discharge static electricity from your body before and during the work.
• Do not touch the circuit board with your bare hands.
• Do not work with dirty hands.
• Be careful not no fold the flat plate cable.
• Do not touch the terminal connector of the flat plate cable with your bare hands. (If you have touched it, wipe it off thoroughly.) 1. Remove the audio unit (see page 23-115), and the climate control unit (see page 21-191).
2. Remove the mounting screws and the audio unit (A) from the audio switch panel (B).

3. Install the audio switch panel in the reverse order of removal.
 Audio Unit Removal/Installation
With Navigation
SRS components are located in this area. Review the
SRS component locations (see page 24-23), and the
precautions and procedures (see page 24-25) before
doing repairs or service.
...
 Audio Disc Changer
Removal/Installation
Audio Disc Changer
Removal/Installation
With Navigation
NOTE:
• Put on gloves to protect your hands.
• Take care not to scratch the dashboard and related
parts.
• Lay a shop towel under the parts when working on
the ...
See also:
Driveshaft Reassembly
Exploded View
Special Tools Required
-Boot Band Tool KD-3191 or equivalent, commercially
available
•Seal Clamp Tool Kent-Moore J-35910 or
equivalent,
commercially available
-Boot Band P ...
CD Player
If a disc error occurs, you may see the following error messages.
...
Safe Driving
...