 Honda Accord: Audio Disc Changer
Removal/Installation
Honda Accord: Audio Disc Changer
Removal/Installation
With Navigation
NOTE: • Put on gloves to protect your hands.
• Take care not to scratch the dashboard and related parts.
• Lay a shop towel under the parts when working on them to protect the face panel from scratches or other damage.
• Eject all the discs before remove the audio disc changer unit to prevent damaging the audio disc changer load mechanism.
1. Remove the center console panel (see page 20-157) and the dashboard center pocket (see page 20-168).
2. Remove the bolts (A), then pull out the audio disc changer (6).
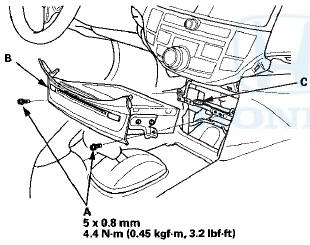
3. Disconnect the connector (C), then remove the audio disc changer.
4. Install the audio disc changer in the reverse order of removal.
 Audio Switch Panel
Removal/Installation
Audio Switch Panel
Removal/Installation
With Navigation
NOTE:
• Put on gloves to protect your hands.
• Take care not to scratch the dashboard and related
parts.
• Lay a workshop towel under the parts when working
on ...
 Audio-HVAC Subdisplay Unit
Removal/Installation
Audio-HVAC Subdisplay Unit
Removal/Installation
With Navigation
NOTE:
• Put on gloves to protect your hands.
• Take care not to scratch the dashboard.
1. Remove the dashboard center vent (see page 20-178).
2. Remove the screws, ...
See also:
Setting the Clock
On models without navigation system
To set the time, press the CLOCK
button until you hear a beep. The
displayed time begins to blink.
Change the hours by pressing the H
(hour) button until th ...
Changing the Wiper Blade Rubber
1. Lift the driver side wiper arm first, then the
passenger side.
2. Press and hold the tab, then slide the blade
from the wiper arm.
NOTICE
Avoid dropping the wiper arm; it may damage the ...
Changing a Flat Tire
If you have a flat tire while driving,
pull over safely. Drive slowly along
the shoulder until you get to an area
far away from traffic lanes.
The vehicle can easily roll off
the jack, se ...