 Honda Accord: Alternator Removal and
Installation
Honda Accord: Alternator Removal and
Installation
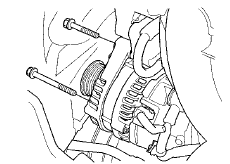
Removal
1. Do the battery terminal disconnection procedure (see page 22-91).
2. Remove the drive belt (see page 4-30).
3. Remove the two bolts securing the alternator.
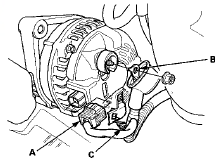
4. Disconnect the alternator connector (A) and the positive alternator cable (B), and remove the harness clamp (C), then remove the alternator.
Installation
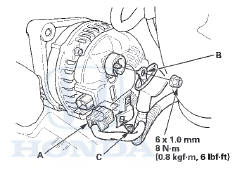
1. Install the alternator, then connect the alternator connector (A) and the positive alternator cable (B), and install the harness clamp (C). Make sure the crimped side of the ring terminal faces away from the alternator when you connect it.
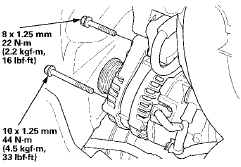
2. Tighten the two bolts securing the alternator.
3. Install the drive belt (see page 4-30).
4. Do the battery terminal reconnection procedure (see page 22-91).
 Tensioner Pulley
Replacement
Tensioner Pulley
Replacement
1. Remove the auto-tensioner (see page 4-31).
2. Clamp the auto-tensioner (A) by using two 8 mm bolts
(B) and a vise (C) as shown. Do not clamp the
auto-tensioner itself, then remove the tensione ...
 Alternator Overhaul
Exploded View
Special Tools Required
- Driver Handle, 15 x 135L 07749-0010000
- Bearing Driver Attachment, 42 x 47 mm 07746-0010300
NOTE: Refer to the Exploded View as needed during this
proced ...
See also:
Radiator and A/C Condenser Fan
Common Circuit Troubleshooting
NOTE:
• Do not use this troubleshooting procedure if only one
fan is inoperative, or if the A/C compressor is
inoperative. Refer to the symptom troubleshooting
index.
• Before doing s ...
Differential Thrust Clearance Adjustment
Special Tools Required
Driver Handle, 40 mm I.D. 07746-0030100
1 Remove trie left driveshaft side oil seal from the
transmission housing (see page 13-70).
2. If you removed the 80 mm shim from t ...
Trunk Lid Cushion Replacement
1. Remove the trunk lid cushion (A) by pulling it out to
detach the clips.
2. Replace the trunk lid cushion with a new one.
3. Install the trunk lid cushion by pushing on the clip
areas until ...