 Honda Accord: Air Cleaner Element
Inspection / Replacement
Honda Accord: Air Cleaner Element
Inspection / Replacement
1. Open the air cleaner housing cover (A).
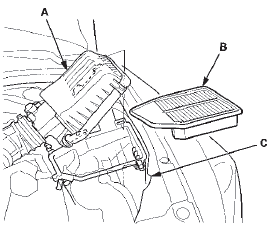
2. Remove the air cleaner element (B) from the air cleaner housing (C).
3. Check the air cleaner element for damage or clogging.
If it is damaged or clogged, replace it.
NOTE: Do not use compressed air to clean the air cleaner element.
4. Clean and remove any debris from inside the air cleaner.
5. Install the parts in the reverse order of removal.
- If you did not replace the air cleaner element, this procedure is complete.
- If the maintenance minder required air cleaner replacement, reset the maintenance minder (see page 3-7).
- If the idle speed fluctuates, do the idle speed inspection (see page 11-292).
 Air Cleaner Removal/Installation
1. Disconnect the MAF sensor/IAT sensor connector (A).
2. Remove the harness clamps (B) and the bolts (C).
3. Loosen the band (D), then remove the air cleaner
housing (E).
4. Install the par ...
 Intake Air Resonator
Removal / Installation
Intake Air Resonator
Removal / Installation
1. Do the battery removal procedure (see page 22-92).
2. Remove the air cleaner (see page 11-332).
3. Remove the battery base (A)
4. Remove the front grille cover.
- 2-door (see page 2 ...
See also:
DTC Troubleshooting
DTC B10CF: Left Daytime Running Lights
Circuit Malfunction
NOTE:
• Make sure the No. 15 (7.5 A) fuse in the driver's
under-dash fuse/relay box is OK.
• If you are troubleshooting mult ...
Switch Test/Replacement
1. Remove the center console panel (see page 20-157).
2. Disconnect the 6P (or 7P*) connector from the seat
heater switch, then remove the switch.
*: Front passenger's seat heater switch
3. ...