 Honda Accord: Active Noise Cancellation
Microphone
Removal/Installation
Front
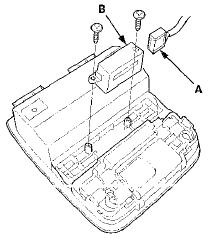
1. Remove the roof console (see page 20-140), and disconnect the connector (A) from the front active noise cancellation microphone (B).

2. Remove the screws and the front active noise cancellation microphone.
3. Install the microphone in the reverse order of removal.
Rear
1. Remove the rear shelf (see page 20-128).
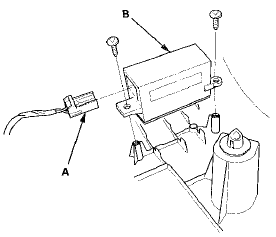
2. Disconnect the connector (A), then remove the screws and the rear active noise cancellation microphone (B).

3. Install the microphone in the reverse order of removal.
 XM Receiver Removal/Installation
1. Open the trunk lid, and remove the right trunk side
trim panel {see page 20-132).
2. Disconnect the connectors (A) from the XM receiver
(B).
4-Door
3. Remove the mounting bolt (C) and lo ...
 Crossover Network Control Unit
Removal/Installation
Driver's Door Speaker Crossover Network
Control Unit
1. Remove the driver's dashboard lower cover (see page
20-166).
2. Disconnect the connector (A), then remove the
driver's door speaker cross ...
See also:
Shift Cable Replacement
1. Remove the center console (see page 20-158).
2. Move the shift lever to R.
3. Remove the nut securing the shift cable end.
5. Rotate the socket holder retainer (A) counterclockwise
(B) ...
Transmission Installation
Special Tools Required
- Engine Support Hanger, A and Reds AAR-T1256*
- Engine Hanger Adapter VSB02C000015*
- Subframe Adapter VSB02C000016*
- Subframe Alignment Pin 070AG-SJAA10S
*: Are availabl ...
Front Seat Slide Lever Replacement
Driver's seat (manual height adjustable
seat)/passenger's seat
NOTE:
- Put on gloves to protect your hands.
- Take care not to tear or damage the seat covers.
1. Remove the front seat {see pa ...
