 Honda Accord: A/T Clutch Pressure Control Solenoid
Valve B and C Replacement
Honda Accord: A/T Clutch Pressure Control Solenoid
Valve B and C Replacement
1. Do the battery removal procedure (see page 22-92).
2. Remove the battery base (see step 8 on page 5-3).
3. Disconnect the A/T clutch pressure control solenoid valves B and C connectors.
4. Remove N T clutch pressure control solenoid valves B andC.
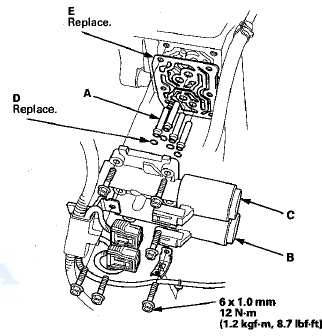
5. Remove the ATF joint pipes (A), the O-rings (D), and the gasket (E).
6. Clean the mounting surface and the fluid passages of the transmission housing.
7. Install a new gasket on the transmission housing, and install the ATF joint pipes. Install new O-rings over the ATF joint pipes.
NOTE: Be sure to install a new gasket with the blue side toward the transmission housing.
8. Install new A/T clutch pressure control solenoid valves B and C.
9. Check the connectors for rust, dirt, or oil, and clean or repair if necessary. Then connect the connectors securely.
10. Install the battery base (see step 63 on page 5-22).
11. Do the battery installation procedure (see page 22-92).
 A/T Clutch Pressure Control Solenoid
Valve B and C Test
A/T Clutch Pressure Control Solenoid
Valve B and C Test
1. Connect the HDS to the DLC (A) located under the
driver's side of the dashboard.
2. Turn the ignition switch to ON (II). Make sure the HDS
communicates with the PCM. If it does not, go to the
...
 Input Shaft (Mainshaft) Speed Sensor
Replacement
Input Shaft (Mainshaft) Speed Sensor
Replacement
1. Remove the nut securing the under-hood fuse/relay
box, and swing it out of the way.
2. Remove the intake air duct and the air cleaner
housing.
3. Disconnect the input shaft (mainshaft) spee ...
See also:
Introduction
One of the best ways to enhance the enjoyment of your new vehicle is to
read this manual. In it, you will learn how to operate its driving controls and
convenience items. Afterwards, keep this own ...
Valve Seat Reconditioning
1. Inspect the valve stem-to-guide clearance (see page
6-88). If the valve guides are worn, replace them (see
page 6-88) before cutting the valve seats.
2. Renew the valve seats in the cylinder h ...
Playing an iPod (Models with navigation system)
Playing an iPod (Models with navigation system) ...