 Honda Accord: Front Seat Belt Replacement
Front Seat Belt - 2-door
SRS components are located in this area. Review the SRS component locations (see page 24-23) and the precautions and procedures (see page 24-25) before doing repairs or service.
NOTE: • Put on gloves to protect your hands.
• Take care not to tear or damage the seat covers.
• If replacing the front seat belts after deployment, refer to Component Replacement/Inspection After Deployment (see page 24-208) for a complete list of other parts that must also be replaced.
• Check the front seat belts for damage (see page 24-18), and replace them if necessary.
• The driver's seat is shown; the passenger's seat is similar.
1. Slide the front seat forward fully.
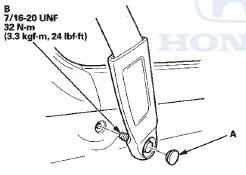
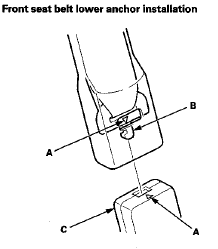
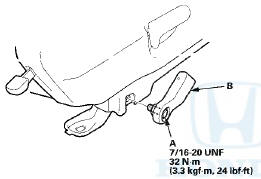
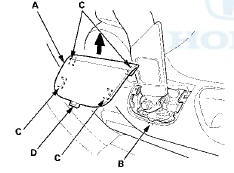
2. Driver's seat belt: Remove the lower anchor cap (A), and remove the lower anchor bolt (B).
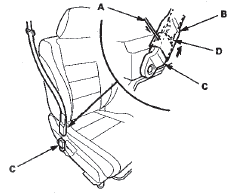
3. Passenger's seat belt: Carefully insert the tip of a small screwdriver (A) through the hole in the back of the front seat belt lower anchor cover (B), and into the hole in the front seat belt lower anchor (C). Unlock the lower anchor by pushing in on the screwdriver.
Remove the screwdriver, and then detach the front seat belt anchor plate (D) and the anchor cover from the lower anchor.
4. Do the battery terminal disconnection procedure (see page 22-91), then wait at least 3 minutes before beginning work.
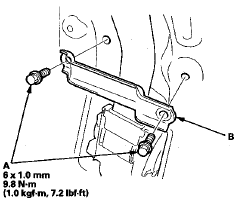
5. Remove these items: • Door sill trim (see page 20-105) • Rear side trim panel (see page 20-127) 6. Remove the bolts (A), then remove the seat belt guide (B).
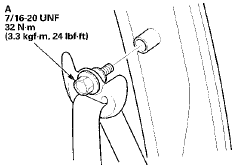
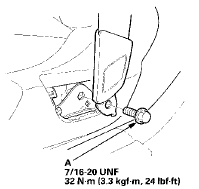
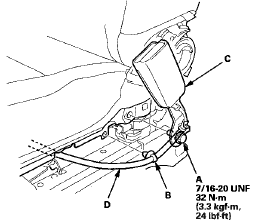
7. Remove the upper anchor bolt (A).
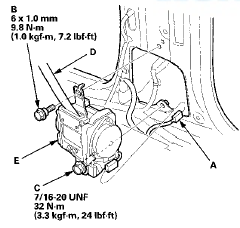
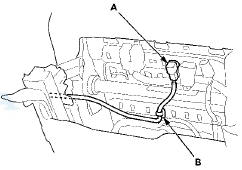
8. Disconnect the seat belt tensioner connector (A).
Remove the upper retractor mounting bolt (B) and the lower retractor bolt (C), then remove the front seat belt (D) and the retractor (E).
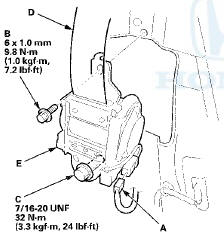
9. Install the seat belt in the reverse order of removal, and note these items: • Apply medium strength liquid thread lock to the upper anchor bolts before reinstallation.
• Tighten the bolts by hand first, then tighten to the specified torque.
• Check that the retractor locking mechanism functions (see page 24-18).
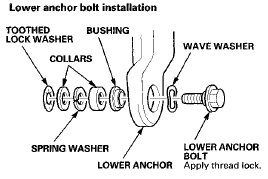
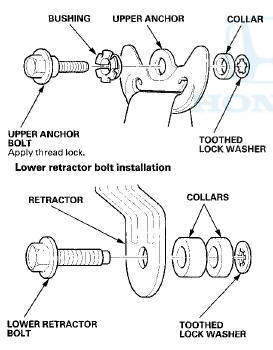
• Assemble the washers, the collars, and the bushings on the upper and lower anchor bolts as shown.
• Before installing the anchor bolts, make sure there are no twists or kinks in the seat belt.
• Make sure the seat belt tensioner connector is plugged in properly.
• Passenger's seat belt: Triangle marks (A) on the anchor plate (B) and on the lower anchor (C) must face the same side.
• Passenger's seat belt: Insert the hook on the anchor plate into the lower anchor, and be sure that the lower anchor is locked securely.
• Do the battery terminal reconnection procedure (see page 22-91).
Upper anchor bolt installation

Front Seat Belt Buckle - 2-door
SRS components are located in this area. Review the SRS component locations (see page 24-23) and the precautions and procedures (see page 24-25) before doing repairs or service.
NOTE: • Put on gloves to protect your hands.
• Take care not to tear or damage the seat covers.
1. Do the battery terminal disconnection procedure (see page 22-91), then wait at least 3 minutes before beginning work.
2. Remove the front seat (see page 20-194).
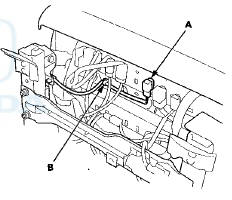
3. Lift up the front seat, then detach the seat belt buckle switch connecter clip (A), and detach the harness clips (B).
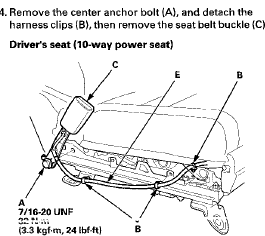
Driver's seat (10-way power seat)
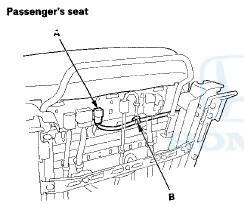
Passenger's seat
5. Passenger's seat: Release the hook strip (D), and pull back the seat cushion cover.
6. Pull out the seat belt buckle switch harness (E) through the space between the seat cushion and the seat track (driver's seat), or through the hole in the seat track (passenger's seat).
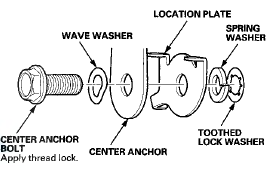
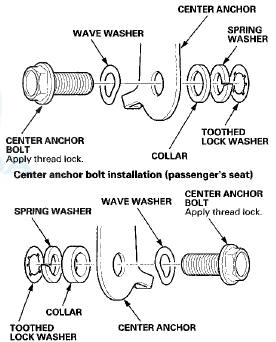
7. Install the buckle in the reverse order of removal, and note these items: • Assemble the washers and the collar on the center anchor bolt as shown.
• Apply medium strength liquid thread lock to the center anchor bolt before reinstallation.
• Tighten the bolts by hand first, then tighten to the specified torque.
• Make sure the seat belt buckle switch connector is plugged in properly.
• Do the battery terminal reconnection procedure (see page 22-91).
Center anchor bolt installation
Passenger's Seat Belt Lower Anchor - 2-door
NOTE: • Put on gloves to protect your hands.
• Take care not to tear or damage the seat covers.
1. Remove the door sill trim (see page 20-105).
2. Detach the front passenger's seat belt anchor plate and the anchor cover from the tower anchor.
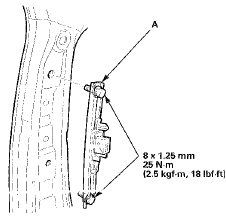
3. Remove the lower anchor bolt (A), then remove the lower anchor (B).
4. Install the lower anchor in the reverse order of removal, and note these items: • Assemble the washers, the collars, and the bushing on the lower anchor bolt as shown.
• Apply medium strength liquid thread lock to the lower anchor bolt before reinstallation.
Front Seat Belt - 4-door
SRS components are located in this area. Review the SRS component locations (see page 24-21) and the precautions and procedures (see page 24-25) before doing repairs or service.
NOTE: • Put on gloves to protect your hands.
• Take care not to tear or damage the seat covers.
• If replacing the front seat belts after deployment, refer to Component Replacement/Inspection After Deployment (see page 24-208)for a complete list of other parts that must also be replaced.
• Check the front seat belts for damage (see page 24-18), and replace them if necessary.
• The driver's la shown; the passenger's seat is similar.
1. Slide the front seat all the way forward. Carefully pry up on the bottom of the anchor cover (A) at the pry point (B) with the appropriate trim tool to release the hooks (C) and the tab (D), then remove the cover by pulling it upward.
Driver's seat
Passenger's seat
2. Remove the lower anchor bolt (A).
3. Do the battery terminal disconnection procedure (see page 22-91), then wait at least 3 minutes before beginning work.
4. Remove the B-pillar upper/lower trim (see page 20-116).
5. Remove the upper anchor bolt (A).

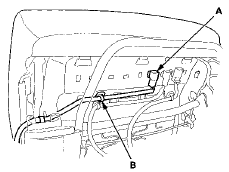
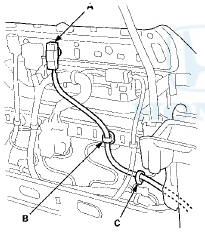
6. Disconnect t h e seat belt t e n s i o n e r connector (A).
Remove t h e u p p e r retractor m o u n t i n g bolt (B) a n d t he lower retractor b o l t (C), t h e n r e m o v e t h e f r o n t seat belt (D) and t h e r e t r a c t o r (E).
Driver's side

Passenger's side
7. Remove the shoulder anchor adjuster (A).
8. Install the seat belt in the reverse order of removal, and note these items: • Apply medium strength liquid thread lock to the upper anchor bolts before reinstallation.
• Tighten the bolts by hand first, then tighten to the specified torque.
• Check that the retractor locking mechanism functions (see page 24-18).
• Assemble the washer, the collars, and the bushing on the upper anchor bolt and the lower retractor bolt as shown.
• Before installing the anchor bolts, make sure there are no twists or kinks in the seat belt.
• Make sure the seat belt tensioner connector is plugged in properly.
• Do the battery terminal reconnection procedure (see page 22-91).
Upper anchor bolt installation
Front Seat Belt Buckle - 4-door
SRS components are located in this area. Review the SRS component locations (see page 24-21) and the precautions and procedures (see page 24-25) before doing repairs or service.
NOTE: • Put on gloves to protect your hands.
• Take care not to tear or damage the seat covers.
1. Do the battery terminal disconnection procedure (see page 22-91), then wait at least 3 minutes before beginning work.
2. Remove the front seat (see page 20-194).
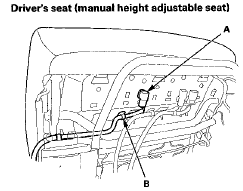
3. Lift up the front seat, then detach the seat belt buckle switch connecter clip (A), and detach the harness clips (B) and the harness holder (C) (passenger's seat).
Driver's seat (10-way power seat
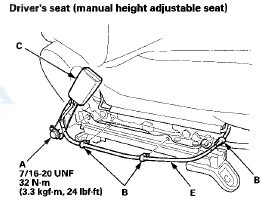
Driver's seat (manual height adjustable seat)
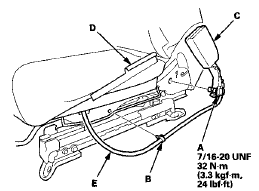
Passenger's seat
4. Remove the center anchor bolt (A), and detach the harness clips (B), then remove the seat belt buckle (C).
Driver's seat (10-way power seat)


Passenger's seat
5. Pull out the seat belt buckle switch harness (D) through the space between the seat cushion and the seat track.
6. Install the buckle in the reverse order of removal, and note these items; • Assemble the washers and the collar on the center anchor bolt as shown.
• Apply medium strength-liquid thread lock to the center anchor bolt before reinstallation.
• Tighten the bolts by hand first, then tighten to the specified torque.
• Make sure the seat belt buckle switch connector is plugged in properly.
• Do the battery terminal reconnection procedure (see page 22-91).
• Center .anchor bolt'installation (driver's seat)
 Component Location Index
2-door
4-door
...
 Rear Seat Belt Replacement
Rear Seat Beit
NOTE:
• Put on gloves to protect your hands.
• Take care not to tear or damage the seat
covers.
• Check the rear seat belts for damage (see page 24-18),
and re ...
See also:
ATF Cooler Cleaning
Special Tools Required
•ATF Cooler Cleaner GHTTTCF6H
-Magnetic Nonbypass Spin-On Filter GTHGNBP2*
*: Available through the Honda Tool and Equipment
Program 888-424-6857.
Before installing an ...
Before Driving
Before you begin driving your
vehicle, you should know what
gasoline to use and how to check the
levels of important fluids. You also
need to know how to properly store
luggage or packages. ...