 Honda Accord:
Emblem/Sticker Replacement
Honda Accord:
Emblem/Sticker Replacement
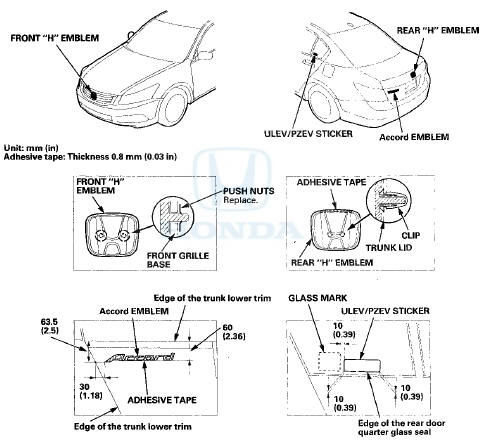
2-door
NOTE: When removing emblems/sticker, take care not to scratch the body.
1. To remove the front "H" emblem, remove the front bumper (see page 20-255).
2. Clean the body surfaces where emblems/sticker are applied with a shop towel dampened in isopropyl alcohol. After cleaning, keep oil, grease, and water from getting on the surface.
3. Apply the emblems/sticker where shown. When installing the ULEV/PZEV sticker on the inside surface of the left quarter glass, align the sticker with the edge of the black ceramic as shown, and press the sticker into place, then remove the application tape.

4-door
NOTE: When removing emblems/sticker, take care not to scratch the body.
1. To remove the front " H " emblem, remove the front grille (see page 20-275).
2. Clean the body surfaces where emblems/sticker are applied with a shop towel dampened in isopropyl alcohol. After cleaning, keep oil, grease, and water from getting on the surface.
3. Apply the emblems/sticker where shown. When installing the ULEV/PZEV sticker on the inside surface of the left rear door quarter glass, align the sticker with the edge of the glass mark and the rear door quarter glass seal as shown, and press the sticker into place, then remove the application tape.
 Trunk Lower Trim Replacement
4-door
NOTE:
- Put on gloves to protect your hands.
- Take care not to scratch the trunk lid.
1. Remove the license plate from the trunk lid.
2. Remove the clips fastening the trunk lower t ...
 Fenderwell
...
See also:
Starter Removal and
Installation
Removal
1 Do the battery removal procedure (see page 22-92).
2. Remove the intake manifold (see page 9-4).
3. Disconnect the positive starter cable (A) from the B
terminal, and the S terminal ...
Regulator Valve Body Disassembly,
Inspection, and Reassembly
1. Clean all parts thoroughly in solvent and dry them with compressed air.
Blow out all passages.
2. Inspect the valve body for scoring and damage.
3. Check all valves for free movement. If an ...
TPMS (Tire Pressure Monitoring System)
Instead of directly measuring the pressure in each tire, the TPMS on this
vehicle
monitors and compares the rolling radius and rotational characteristics of each
wheel and tire while you are dri ...